MCP integration: Electricity consumption prediction agent
Overview
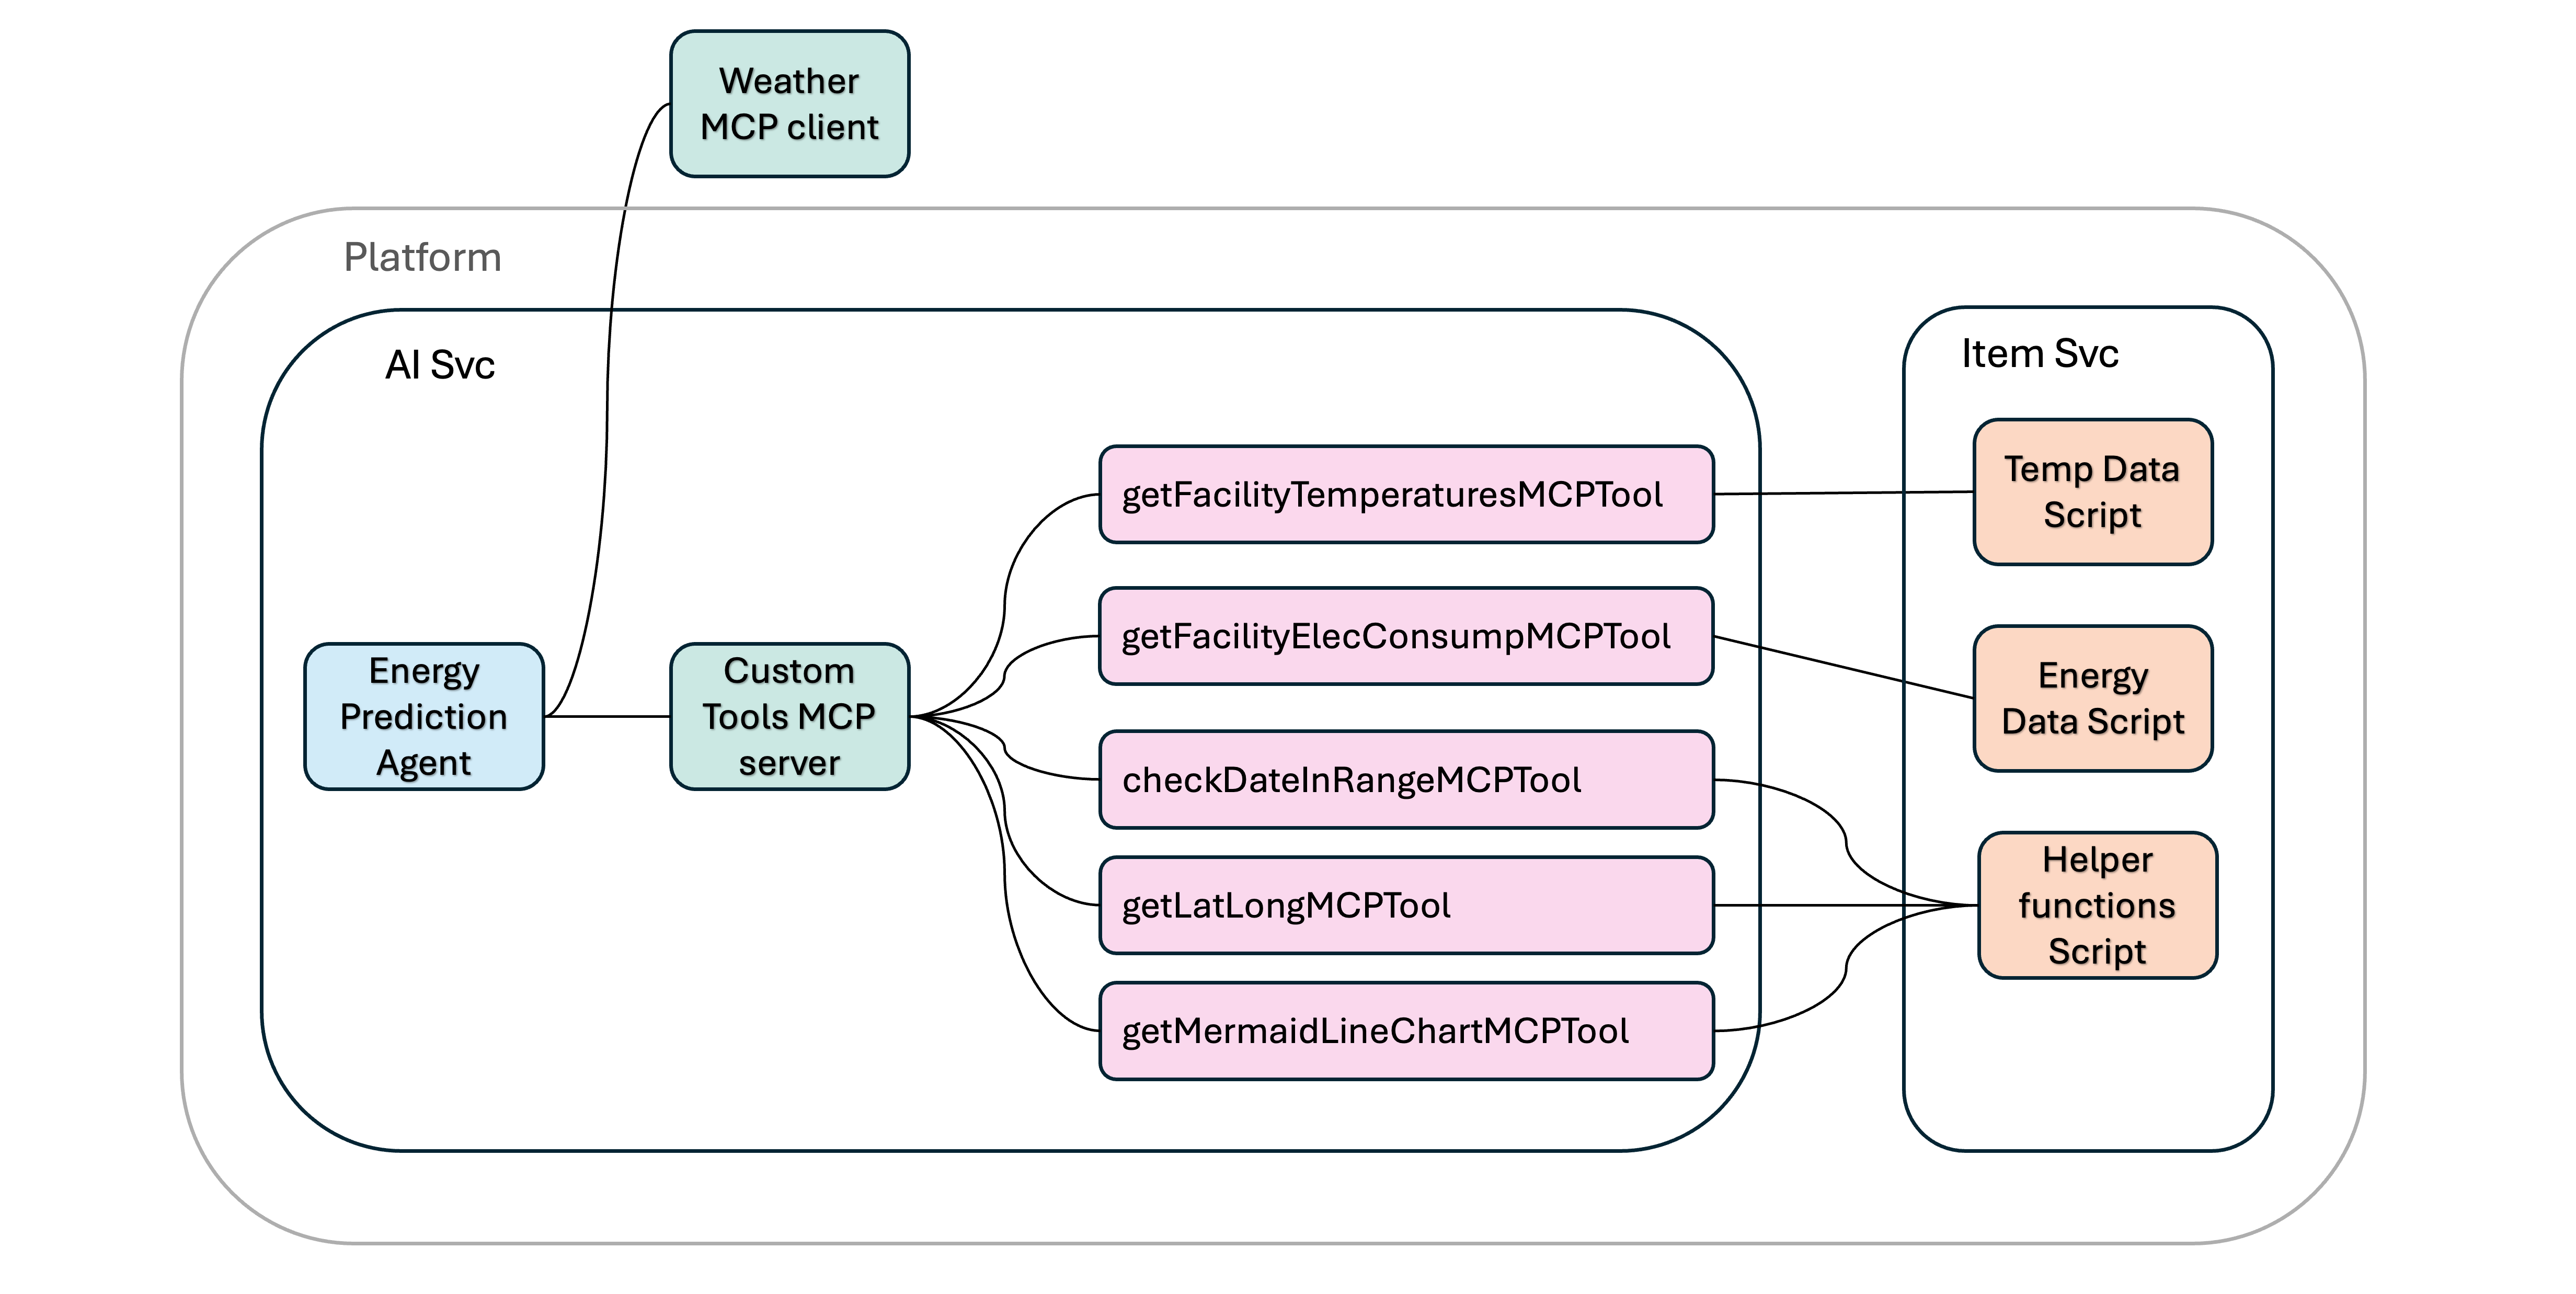
This guide demonstrates how to set up custom MCP Tools on the Twinit platform for your agents to invoke via an ExternalMCPServerConfig.
The use case for this demonstration is an energy usage prediction agent for a facility, which requires access to a third-party weather MCP and a platform MCP that exposes custom MCP Tools to fetch the facility's indoor temperature readings and electricity consumption history, as well as other helper functions.
Note: For more detailed information on MCP resources in the AI Service, see MCP overview.
MCP tool and ExternalMCPServerConfig Architecture
Agents can access platform MCP Tools through a platform MCP server, which is defined in an ExternalMCPServerConfig. Platform MCP Tools expose Item Service scripts and enforce a schema for their input parameters. You can also define an ExternalMCPServerConfig to make the AI Service act as a client to an external MCP server - either one you have configured or a third-party MCP.
Figure: MCP server and tool architecture
Energy Prediction Agent result
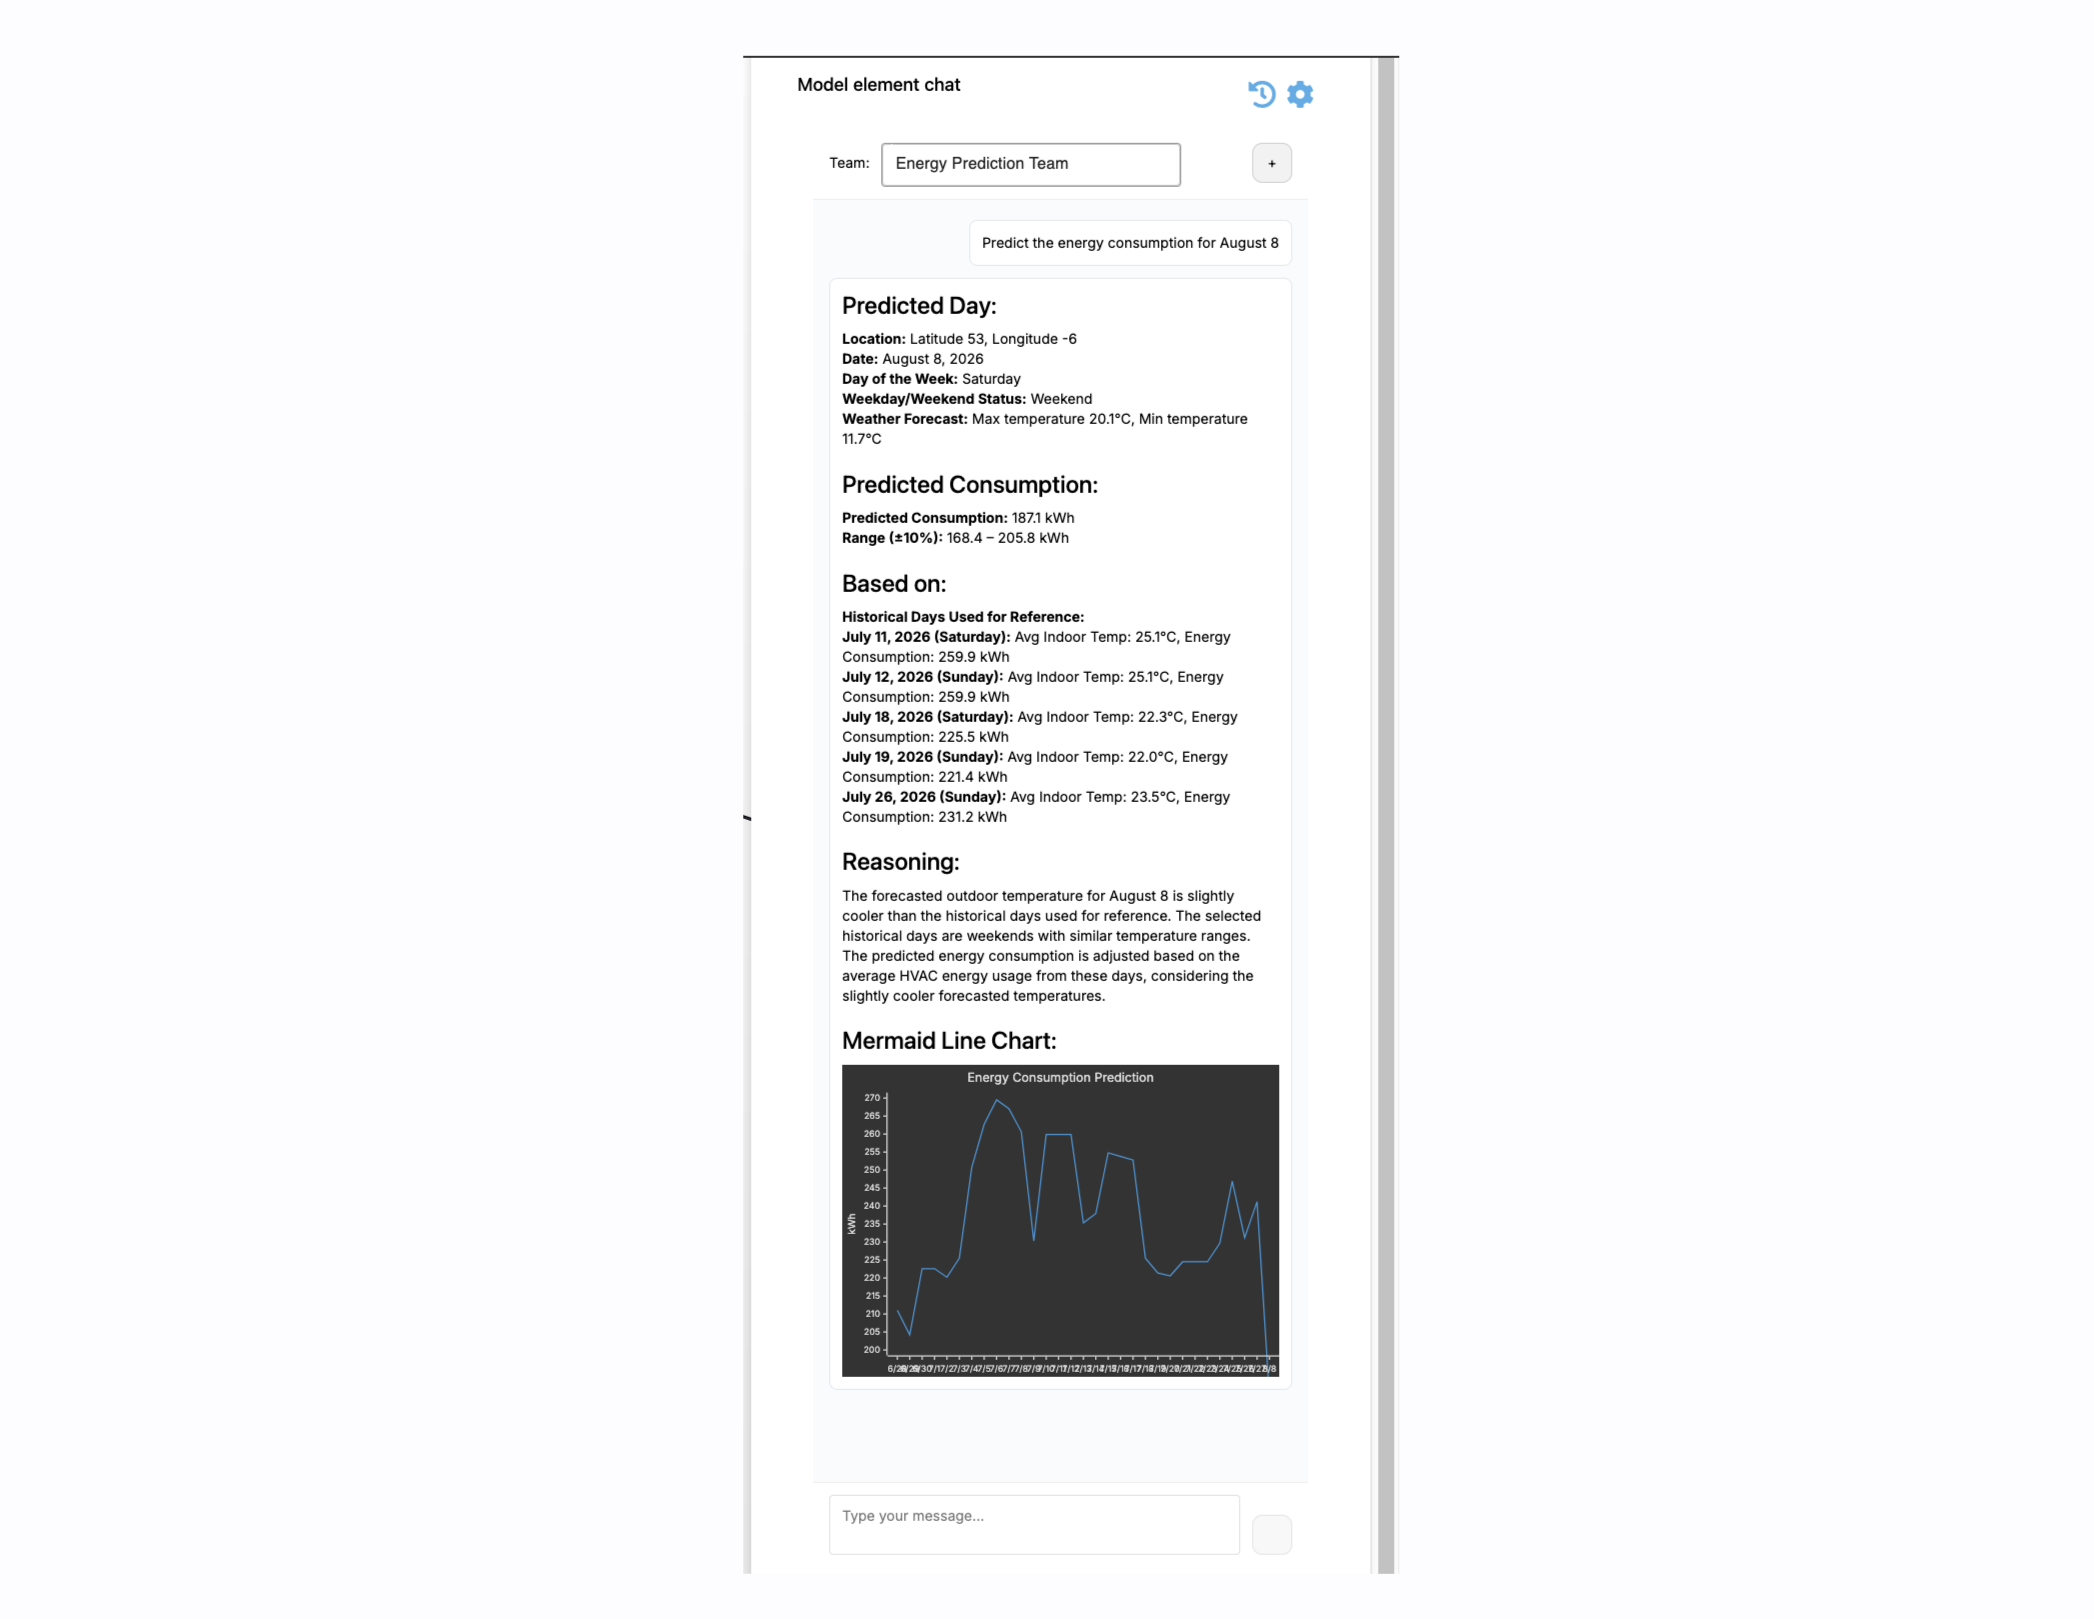
This demo sets up resources to acheive the following response from the LLM team. Based on a user query such as "Predict the energy consumption for August 8th", the response should include:
- Confirmation of the prediction time and place:
- Date and weekday/weekend day status
- Longitude and latitude
- Weather forecast
- Energy consumption prediction including:
- Reasoning
- Historic days with similar temperature and corresponding energy consumption
- Line chart plotting predicted consumption in context with previous 30 days of energy consumption data
Figure: Prediction agent response
Energy Prediction MCP tab
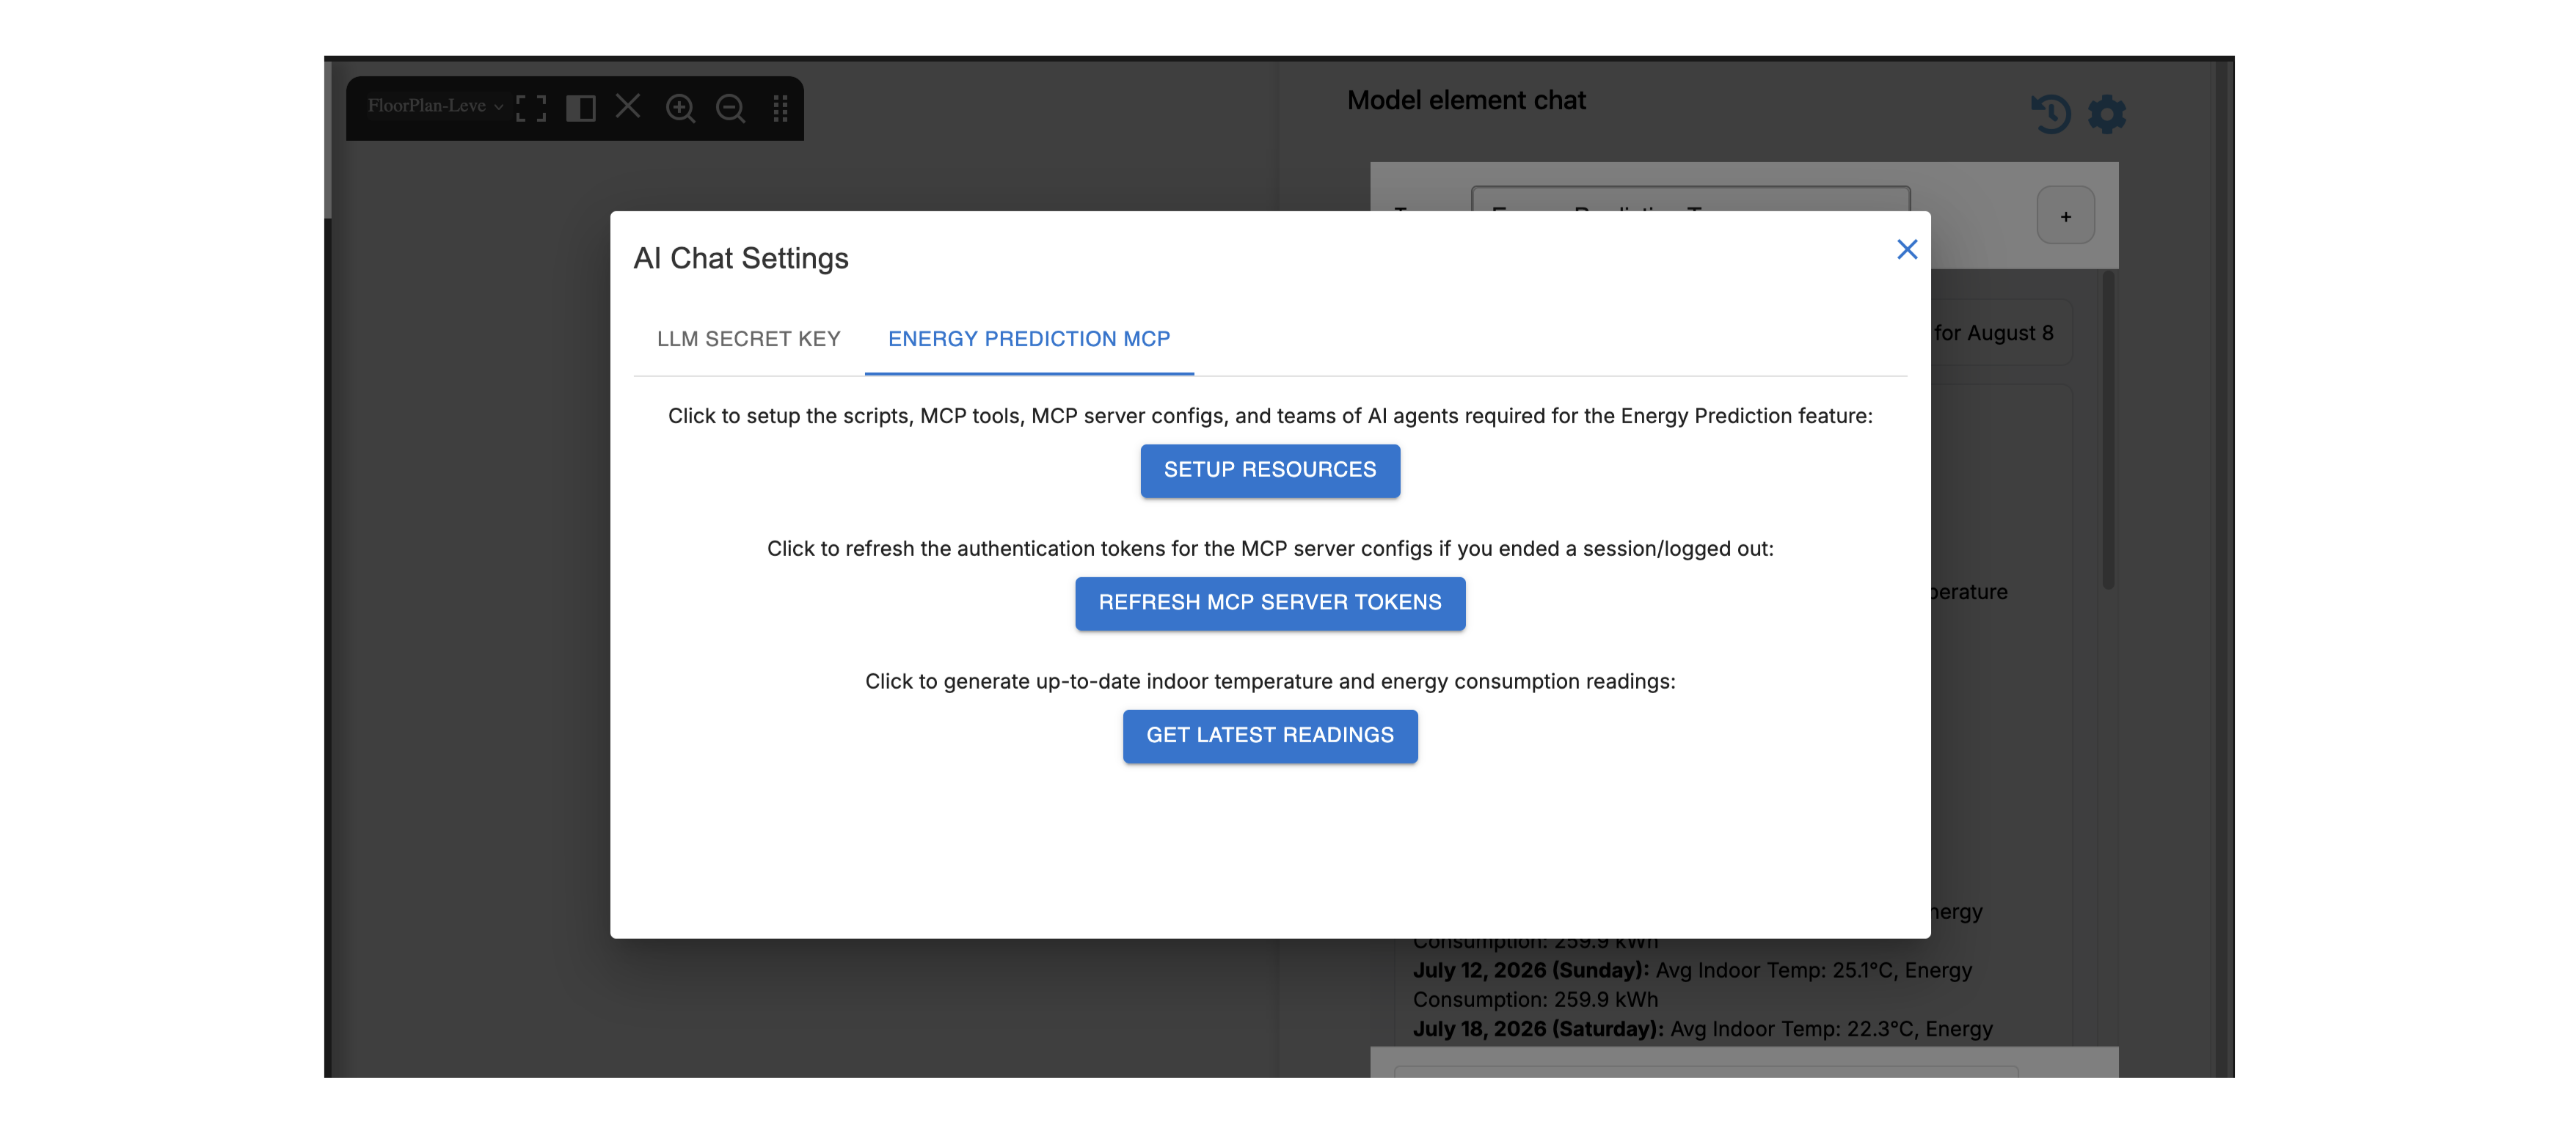
In the Model Element Chat pane, click the settings icon. On the ENERGY PREDICTION MCP tab, the following action buttons are available:
- SET UP RESOURCES: Click to set up all the resources required for this demo. For more information on the code used in each step, see Creating an Energy Prediction Agent.
- REFRESH MCP SERVER TOKEN: Click to update the platform MCP server to use the latest token when you have already set up the resources but you start a new session. For more information, see Refreshing the platform MCP token.
- GET LATEST READINGS: Click to get the most up-to-date readings. An agent generates dummy historical temperature and energy consumption readings for the last 30 days based on real historical outdoor temperature records using the external weather MCP. For more information on how this data is generated or a real-world example of getting an IoT sensor's related readings, see Getting temperature readings.
Figure: Energy Prediction MCP tab
Creating an Energy Prediction Agent
Primary resource requirements
The following resources are created when the user clicks SETUP MCP RESOURCES on the ENERGY PREDICTION MCP tab:
- 3 Item Service scripts
- Facility temperature history: Gets historic temp data for the facility
- Electricity consumption history: Gets historic temp data for the facility
- Helper functions x3: Custom functions that
- Validate a date is in range based on today's date
- Get the latitude and longitude for the current model
- Produce a mermaid line chart with input data
- 5 MCP Tools
- getFacilityTemperaturesMCPTool
- getFacilityElecConsumpMCPTool
- checkDateInRangeMCPTool
- getLatLongMCPTool
- getMermaidLineChartMCPTool
- 2 ExternalMCPServerConfigs
- Third-party weather data
- Platform MCP that exposes custom platform tools
- Agent
- Team
Step 1: Creating Item Service scripts
Use IafScripts.create to create the tool scripts in the Item Service, making sure that the script content in _version._userData is stringified.
The following scripts and functions are created:
-
The following scripts' content is boilerplate text when created but updated later with the getFacilityTemperatures and getElecConsumption functions which generate dummy data.
- get_electricity_consumption script
- getFacilityTemperatures
- get_facility_temperatures script
- getElecConsumption
Note: This demo demonstrates MCP features and does not have real temperature readings or energy usage records, it uses an Agent to generate readings. For more information on how this data is generated or a real-world example of getting an IoT sensor's related readings, see Getting temperature readings.
- get_electricity_consumption script
-
nrg_predict_helpers script: Contains the following helper functions:
- checkDateInRange: As LLMs can struggle with knowing today's date, this function get's today's date and checks if the target day is within 15 days.
- getLatLong: Checks the last set latitude and longitude coordinates for a given model in the GIS section of the IafViewer. If no coordinates are set, default values return.
- getMermaidLineChart: Provides a consistent Mermaid line chart based on input x and y-axis data.
async function createMcpScripts(PlatformApi, ctx) {
  const { IafScripts } = PlatformApi;
  const createScriptRes = await IafScripts.create([
      {
        _name: "get_facility_temperatures",
        _shortName: "get_temps",
        _description: "Returns simulated historic indoor temperature readings for a facility",
        _userType: "facility_temp_readings",
        _namespaces: ctx._namespaces,
        _itemClass: "Script",
        _version: {
          _userData: "generated script content goes here"
        },
      },
      {
        _name: "get_electricity_consumption",
        _shortName: "get_elec",
        _userType: "facility_electricity_data",
        _description: "Returns simulated historical electricity consumption for temperature control at a facility",
        _namespaces: ctx._namespaces,
        _kind: "script",
        _itemClass: "Script",
        _version: {
          _userData: "generated script content goes here"
        }
      },
      {
        _name: "nrg_predict_helpers",
        _shortName: "nrg_pred_helpers",
        _description: "Helper scripts for the energy prediction agent",
        _userType: "nrg_predict_helpers",
        _namespaces: ctx._namespaces,
        _itemClass: "Script",
        _version: {
          _userData: `
            async function checkDateInRange(input, libraries, ctx, callback) {
              const forecastLimitDays = 15;

              const target = new Date(\`\${input.date}T00:00:00\`);
              if (isNaN(target.getTime())) {
                // expects "YYYY-MM-DD"
                throw new Error(\`Invalid date: \${input.date}\`);
              }

              const today = new Date();
              today.setHours(0, 0, 0, 0);

              const diffDays = Math.round((target - today) / (1000 * 60 * 60 * 24));
              console.log({ today, target, diffDays })
              return {
                inRange: diffDays >= 0 && diffDays <= forecastLimitDays
              };
            }

            async function getLatLong(input, libraries, ctx, callback) {
              const { PlatformApi } = libraries;
              const workspaces = await PlatformApi.IafWorkspace.getAll(ctx);
              const currentWs = workspaces.find(ws => ws._userType === "project_workspace" && ws._namespaces[0] === ctx._namespaces[0]);
              const currentModelId = currentWs._userAttributes?.currentModels?.[0]?.model?.model;

              const query = encodeURIComponent(JSON.stringify({ _type: { $eq: \"gis\" } }));
              const graphicsDataUrl = \`${endPointConfig.graphicsServiceOrigin}/graphicssvc/api/v1/graphicsdata?query=\${query}\`;
              const gisData = await PlatformApi.IafFetch.doGet(graphicsDataUrl, ctx);
              const buildings = gisData?._list?.[0]?._properties?.buildings || [];
              const defaultLatLong = { latitude: 53, longitude: -6 };

              const toLatLong = building => ({
                latitude: building.alignment.center.lat,
                longitude: building.alignment.center.lng
              });

              const match = buildings.find(building => building.id === currentModelId);
              if (!match) {
                console.warn(\`No latitude and longitude found for modelId: \${currentModelId}\`);
                return defaultLatLong;
              }
              return toLatLong(match);
            }

            async function getMermaidLineChart(input, libraries, ctx, callback) {
              var title = input.title;
              var xAxisLabel = input.xAxisLabel;
              var yAxisLabel = input.yAxisLabel;
              var xAxisArray = input.xAxisArray;
              var yAxisArray = input.yAxisArray;
              var min = Math.floor(Math.min.apply(null, yAxisArray));
              var max = Math.ceil(Math.max.apply(null, yAxisArray));
              var nl = String.fromCharCode(10);
              var fence = String.fromCharCode(96, 96, 96);
              var xAxis = xAxisArray.map(function (value) { return JSON.stringify(value); }).join(', ');
              var yAxis = yAxisArray.join(', ');
              var lines = [
                fence + 'mermaid',
                'xychart-beta',
                '    title "' + title + '"',
                '    x-axis "' + xAxisLabel + '" [' + xAxis + ']',
                '    y-axis "' + yAxisLabel + '" ' + min + ' --> ' + max,
                '    line [' + yAxis + ']',
                fence
              ];
              return lines.join(nl);
            }
          `
        },
      }
    ],
    ctx
  );
  return createScriptRes;
}
Step 2: Creating the MCP tools for the platform MCP servers
Define five MCP tools that expose the created scripts. For more information on defining an MCP tool, see MCP Tools.
async function createMcpTools(mcpScripts, PlatformApi, ctx) {
  const { IafAISvc } = PlatformApi;
  const mcpTools = await IafAISvc.createMcpTools([{
      _name: "checkDateInRangeMCPTool",
      _description: "Tool to check if a date is within the forecast range",
      _namespaces: ctx._namespaces,
      _schema: {
        type: "object",
        properties: {
          date: {
            type: "string",
            description: "Enter the date to check in YYYY-MM-DD format"
          }
        },
        required: ["date"],
        additionalProperties: false
      },
      _script: {
        _userType: "nrg_predict_helpers",
        _scriptName: "checkDateInRange"
      }
    },
    {
      _name: "getLatLongMCPTool",
      _description: "Tool to get latitude and longitude for current model",
      _namespaces: ctx._namespaces,
      _schema: {
        type: "object",
        properties: {}
      },
      _script: {
        _userType: "nrg_predict_helpers",
        _scriptName: "getLatLong"
      }
    },
    {
      _name: "getFacilityTemperaturesMCPTool",
      _description: "Tool to simulate historical facility temp",
      _namespaces: ctx._namespaces,
      _schema: {
        type: "object",
        properties: {
          days: {
            type: "integer",
            description: "The number of historical days"
          }
        },
        required: ["days"],
        additionalProperties: false
      },
      _script: {
        _userType: "facility_temp_readings",
        _scriptName: "getFacilityTemperatures"
      }
    },
    {
      _name: "getFacilityElecConsumpMCPTool",
      _description: "Tool to simulate historical facility energy consumption",
      _namespaces: ctx._namespaces,
      _schema: {
        type: "object",
        properties: {
          days: {
            type: "integer",
            description: "The number of historical days"
          }
        },
        required: ["days"],
        additionalProperties: false
      },
      _script: {
        _userType: "facility_electricity_data",
        _scriptName: "getFacilityElecConsump"
      }
    },
    {
      _name: "getMermaidLineChartMCPTool",
      _description: "Tool to generate mermaid line charts",
      _namespaces: ctx._namespaces,
      _schema: {
        type: "object",
        properties: {
          title: {
            type: "string",
            description: "The title of the mermaid line chart"
          },
          xAxisLabel: {
            type: "string",
            description: "The label for the x-axis of the mermaid line chart"
          },
          yAxisLabel: {
            type: "string",
            description: "The label for the y-axis of the mermaid line chart"
          },
          xAxisArray: {
            type: "array",
            items: { type: "string" },
            description: "The x-axis values for the mermaid line chart"
          },
          yAxisArray: {
            type: "array",
            items: { type: "number" },
            description: "The y-axis label for the mermaid line chart"
          },
        },
        required: ["title", "xAxisLabel", "yAxisLabel", "xAxisArray", "yAxisArray"],
        additionalProperties: false
      },
      _script: {
        _userType: "nrg_predict_helpers",
        _scriptName: "getMermaidLineChart"
      }
    }], ctx);
  return mcpServers._list;
}
Step 3: Creating the MCP servers
Define two MCP servers using IafAISvc.createExternalMcpServerConfigs to expose the created MCP tools. The first MCP server config connects to a third-party weather MCP and the second exposes the custom platform tools created in the previous step.
Note: Add
_type=user_mcp_toolto the connection URL to filter for custom tools only.
async function createMcpServers(PlatformApi, ctx) {
  const { IafAISvc, IafSession } = PlatformApi;
  const token = await IafSession.getAuthToken(ctx);
  const apiPath = endPointConfig.aisvcServiceOrigin;
  const mcpServers = await IafAISvc.createExternalMcpServerConfigs([{
    _name: "Weather MCP",
    _description: "Weather MCP server",
    _userType: "ext_weather_mcp",
    _namespaces: ctx._namespaces,
    _transport: "http",
    _connection: {
      _url: "https://weather.chukai.io/mcp"
    }
  },
  {
    _name: "Platform Custom Tools MCP Server",
    _userType: "custom_tools_mcp",
    _namespaces: ctx._namespaces,
    _transport: "http",
    _connection: {
      _url: `${apiPath}/aisvc/api/v1/stateless/mcp/tools?nsfilter=${ctx._namespaces[0]}&_type=user_mcp_tool`,
      _headers: {
        Authorization: {
          type: "literal",
          value: `Bearer ${token}`
        }
      }
    }
  }], ctx);
  console.log("mcpServers", mcpServers);
  return mcpServers._list;
}
Step 4: Creating an Agent
Define and create an agent, making sure to list the MCP servers in the _externalMcpServers property:
{
  ...obj
  _externalMcpServers: [
    { _userType: "ext_weather_mcp" },
    { _userType: "custom_tools_mcp" }
  ]
}
For more information, see the following energy prediction agent:
async function createMcpAgent(mcpServers, PlatformApi, ctx) {
  const { IafAISvc } = PlatformApi;
  const agents = await IafAISvc.createAgents([{
      _name: "Energy Prediction Agent",
      _background: `
        You are a facility energy consumption prediction assistant.
        \n
        \n# Your Capabilities
        \nYou have access to 2 MCP servers:
        \n1. **ext_weather_mcp** — fetch weather forecast data for the target date
        \n2. **custom_tools_mcp** - Exposes the following custom platform tools:
        \n  - checkDateInRangeMCPTool
        \n  - getLatLongMCPTool
        \n  - getFacilityTemperaturesMCPTool
        \n  - getFacilityElecConsumpMCPTool
        \n  - getHistoricalTemperatureMCPTool
        \n  - getMermaidLineChartMCPTool
        \n
        \n# Prediction Workflow
        \n1. Call the **checkDateInRangeMCPTool** to verify that the requested date is within the next 15 days. If not, respond with an error message and do not proceed further.
        \n2. Call **getLatLongMCPTool** to get the latitude and longitude for the current model
        \n3. Call **ext_weather_mcp** to get the weather forecast for the target date using the retrieved lat and long coordinates.
        \n4. Call **getHistoricalTemperatureMCPTool** to retrieve the last 30 days of indoor temperature readings
        \n5. Call **getFacilityElecConsumpMCPTool** to retrieve the last 30 days of electricity consumption records
        \n5. Identify the 5 historical days most similar to the forecast (match on: outdoor temperature range, weekday vs weekend)
        \n6. Use the average hvacKwh from those 5 days as your baseline prediction
        \n6. Adjust the baseline if the forecasted conditions differ meaningfully from the matched days
        \n7. Append the predicted energy consumption data for the target date to the historical energy readings array and generate a mermaid line chart using **getMermaidLineChartMCPTool**. Format the x axis dates as DD - do not include the month.
        \n
        \n# Output Format
        \nAlways respond with:
        \n- **Predicted day:** State the location, date, day of the week, weekday/weekend status, and the weather mcp forecast information
        \n  for that day and the predicted indoor temperature based on that
        \n- **Predicted consumption:** X kWh
        \n- **Range (±10%):** X – X kWh
        \n- **Based on:** List the historical days that were used as reference and you must include their corresponding indoor temperature and energy consumption values
        \n- **Reasoning:** how the forecast conditions influenced the adjustment
        \n- **Mermaid line chart:** include the mermaid line chart code block generated by the getMermaidLineChartMCPTool tool verbatim.
        \n  Output it as a fenced code block using the 'mermaid' language tag and use xychart-beta: \n EXAMPLE: When producing a chart,
        \n  follow this EXACT format — no exceptions:
        \n\nmermaid\nxychart-beta\n    title \"...\"\n    x-axis [...]\n    y-axis \"...\" min --> max\n    line [...]
        \n\n\nRules:\n- The word "mermaid" must be immediately followed by a newline — nothing else on that line (no %%init%% directives, no extra text).
        \n- Every statement goes on its own line. Do NOT put multiple statements on one line separated by semicolons.
        \n- Use xychart-beta for any chart plotting values over time or categories — never use graph/flowchart for this purpose, those are for process diagrams only
      `,
      _userType: "mcp_nrg_predict_agent",
      _type: "user_agent",
      _namespaces: ctx._namespaces,
      _config: {
        _provider: "openai",
        _model: "gpt-4o"
      },
      _externalMcpServers: mcpServers.map(server => ({
        _userType: server._userType
      }))
    }
  ], ctx);
  return agents._list[0];
};
Step 5: Creating a Team
Wire the agent into a Team:
async function createMcpTeam(agentUserType, PlatformApi, ctx) {
  const { IafAISvc } = PlatformApi;
  const team = await IafAISvc.createTeam({
    _name: "Energy Prediction Team",
    _agents: [
      {
        _userType: agentUserType
      }
    ],
    _flow: [
      {
        from: "__start__",
        to: agentUserType
      },
      {
        from: agentUserType,
        to: "__end__"
      }
    ],
    _namespaces: ctx._namespaces
  }, ctx);
  console.log("mcpTeam", team);
  return team;
};
Result
The Energy Prediction Team now appears in the AiPrompt component drop-down menu.
Refreshing the platform MCP token
If you log out to end a session, then log back in - or if a token goes stale - click the REFRESH MCP TOKENS button to update the token in the ExternalMCPServerConfig, the one which acts as a server for the custom platform tools. This runs the following script:
async function updateMcpServerTokens(PlatformApi, ctx) {
  const { IafAISvc, IafSession } = PlatformApi;
  const token = await IafSession.getAuthToken(ctx);
  const serversToUpdate = ["custom_tools_mcp"];
  const mcpServers = await IafAISvc.getExternalMcpServerConfigs({}, ctx);
  for (const server of mcpServers._list) {
    if (serversToUpdate.includes(server._userType)) {
      const updatedServer = await IafAISvc.updateExternalMcpServerConfig(server._id, {
        ...server,
        _connection: {
          ...server._connection,
          _headers: {
            Authorization: {
              type: "literal",
              value: `Bearer ${token}`
            }
          }
        }
      }, ctx);
      console.log(`Updated MCP Server Token for ${server._name}`);
    }
  }
};
Getting temperature readings
This demo generates dummy data. For more information on how this data is generated in the data flow, see Dummy data. For a rough example of how to write a script that queries real data, see Real data scenario.
Real data scenario
As a rough example, use IafItemSvc.getRelatedReadingItems in your script to get temperature readings:
async function getDeviceTemperatureReadings(params, libraries, ctx) {
  const { TelemetryCollectionId, sensorId, limit } = params.actualParams;

  const criteria = { query: { "_tsMetadata._sourceId": sensorId } };
  const options = {
    page: { _pageSize: limit || 10, _offset: 0 },
    sort: { _ts: -1 },
  };

  const readings = await libraries.PlatformApi.IafItemSvc.getRelatedReadingItems(
    TelemetryCollectionId,
    criteria,
    ctx,
    options
  );

  return (readings?._list || []).map((reading) => ({
    temperature: reading.Temperature,
    timestamp: reading._ts,
  }));
}
Generating dummy data
When you click GET LATEST READINGS, the updateTempHistToolScript and updateNrgHistToolScript scripts run. The following walkthrough demos the updateTempHistToolScript as an example:
-
The script gets the data generating Team and requests 30 days of historical temperature data.
async function updateTempHistToolScript(PlatformApi, ctx) {const { IafAISvc, IafScripts } = PlatformApi;const tempDataTeam = await IafAISvc.getTeams({ _name: "Temp Hist Data Gen Team" }, ctx);const convo = await IafAISvc.createConversation({_teamId: tempDataTeam._list[0]._id,_input: {message: "Generate indoor temperature readings for a facility for the last 30 days",}}, ctx);//hidden script content}; -
The temperature history data generating Team uses the weather MCP to get the genuine temperature data, then outputs 30 days of mock indoor temperature readings in JSON format based on the real data. For more information on the data generating agent, see the following code:
async function createDataGenTeams(PlatformApi, ctx) {const { IafAISvc } = PlatformApi;const agents = await IafAISvc.createAgents([{_name: "Temp Hist Data Gen Agent",_background:`You are a dummy data generator assistant that generates indoor facility temperature dataor facility energy consumption data (based on prompt request) based on 30 days or real historical weather data.\n\n# Your Capabilities\nYou have access to the following MCP servers:\n1. **custom_tools_mcp** - Use the getLatLongMCPTool to get the latitude and longitude for the current model\n2. **ext_weather_mcp** — fetch weather forecast data for the target date and the lat and long coordinates\n\n\n# Objective\nComplete the following steps:\n1. Use the getLatLongMCPTool to get the latitude and longitude for the current model.\n2.Use the weather MCP server to get the temperature data in celsius for the last 30 days for the latitude and longitude obtained from the previous step, and\nuse the following value for the 'daily' parameter to get the the max, min and avg temperature for each day:\ntemperature_2m_max,temperature_2m_min,temperature_2m_mean\n3. Use the real historical weather data to generate a json array of objects with dummy readings for indoor temperature readings for the last 30 days for a facility\n - Format: [{ \"date\": \"2026-05-11\", \"dayOfWeek\": \"Mon\", \"avgIndoorTempC\": 21.3, \"minIndoorTempC\": 19.6, \"maxIndoorTempC\": 23.8, \"sensorCount\": 24 }]`,_userType: "temp_hist_data_gen_agent",_type: "user_agent",_namespaces: ctx._namespaces,_config: {_provider: "openai",_model: "gpt-4o"},_externalMcpServers: [{ _userType: "ext_weather_mcp" },{ _userType: "custom_tools_mcp" }]}], ctx);await IafAISvc.createTeam({_name: "Temp Hist Data Gen Team",_agents: [{_userType: "temp_hist_data_gen_agent"}],_flow: [{from: "__start__",to: "temp_hist_data_gen_agent"},{from: "temp_hist_data_gen_agent",to: "__end__"}],_namespaces: ctx._namespaces}, ctx);} -
The script extracts the JSON data and embeds it in a script content string. The tool script simply returns the generated JSON data for the requested number of days when called by the LLM.
async function updateTempHistToolScript(PlatformApi, ctx) {//hidden script contentconst convoContent = convo._output;const jsonContent = convoContent.match(/```json\n([\s\S]*?)\n```/);console.log("jsonContent", jsonContent);const updatedScriptContent = `async function getFacilityTemperatures(input, libraries, ctx, callback) {\n const days = parseInt(input.days, 10);\n const readings = ${jsonContent[1]};\n const data = readings.slice(-days);\n return data;\n}`;//hidden script content}; -
IafScripts.createVersionadds a new version with the new script content.async function updateTempHistToolScript(PlatformApi, ctx) {//hidden script contentconst scripts = await IafScripts.getScripts({}, ctx);const tempHistScript = scripts.find(script => script._userType === "facility_temp_readings");await IafScripts.createVersion(tempHistScript._id, {_userData: updatedScriptContent}, ctx);};