Platform Application
A platform Application is any end user application such as web app, mobile app, or command line tool that is built on the platform.
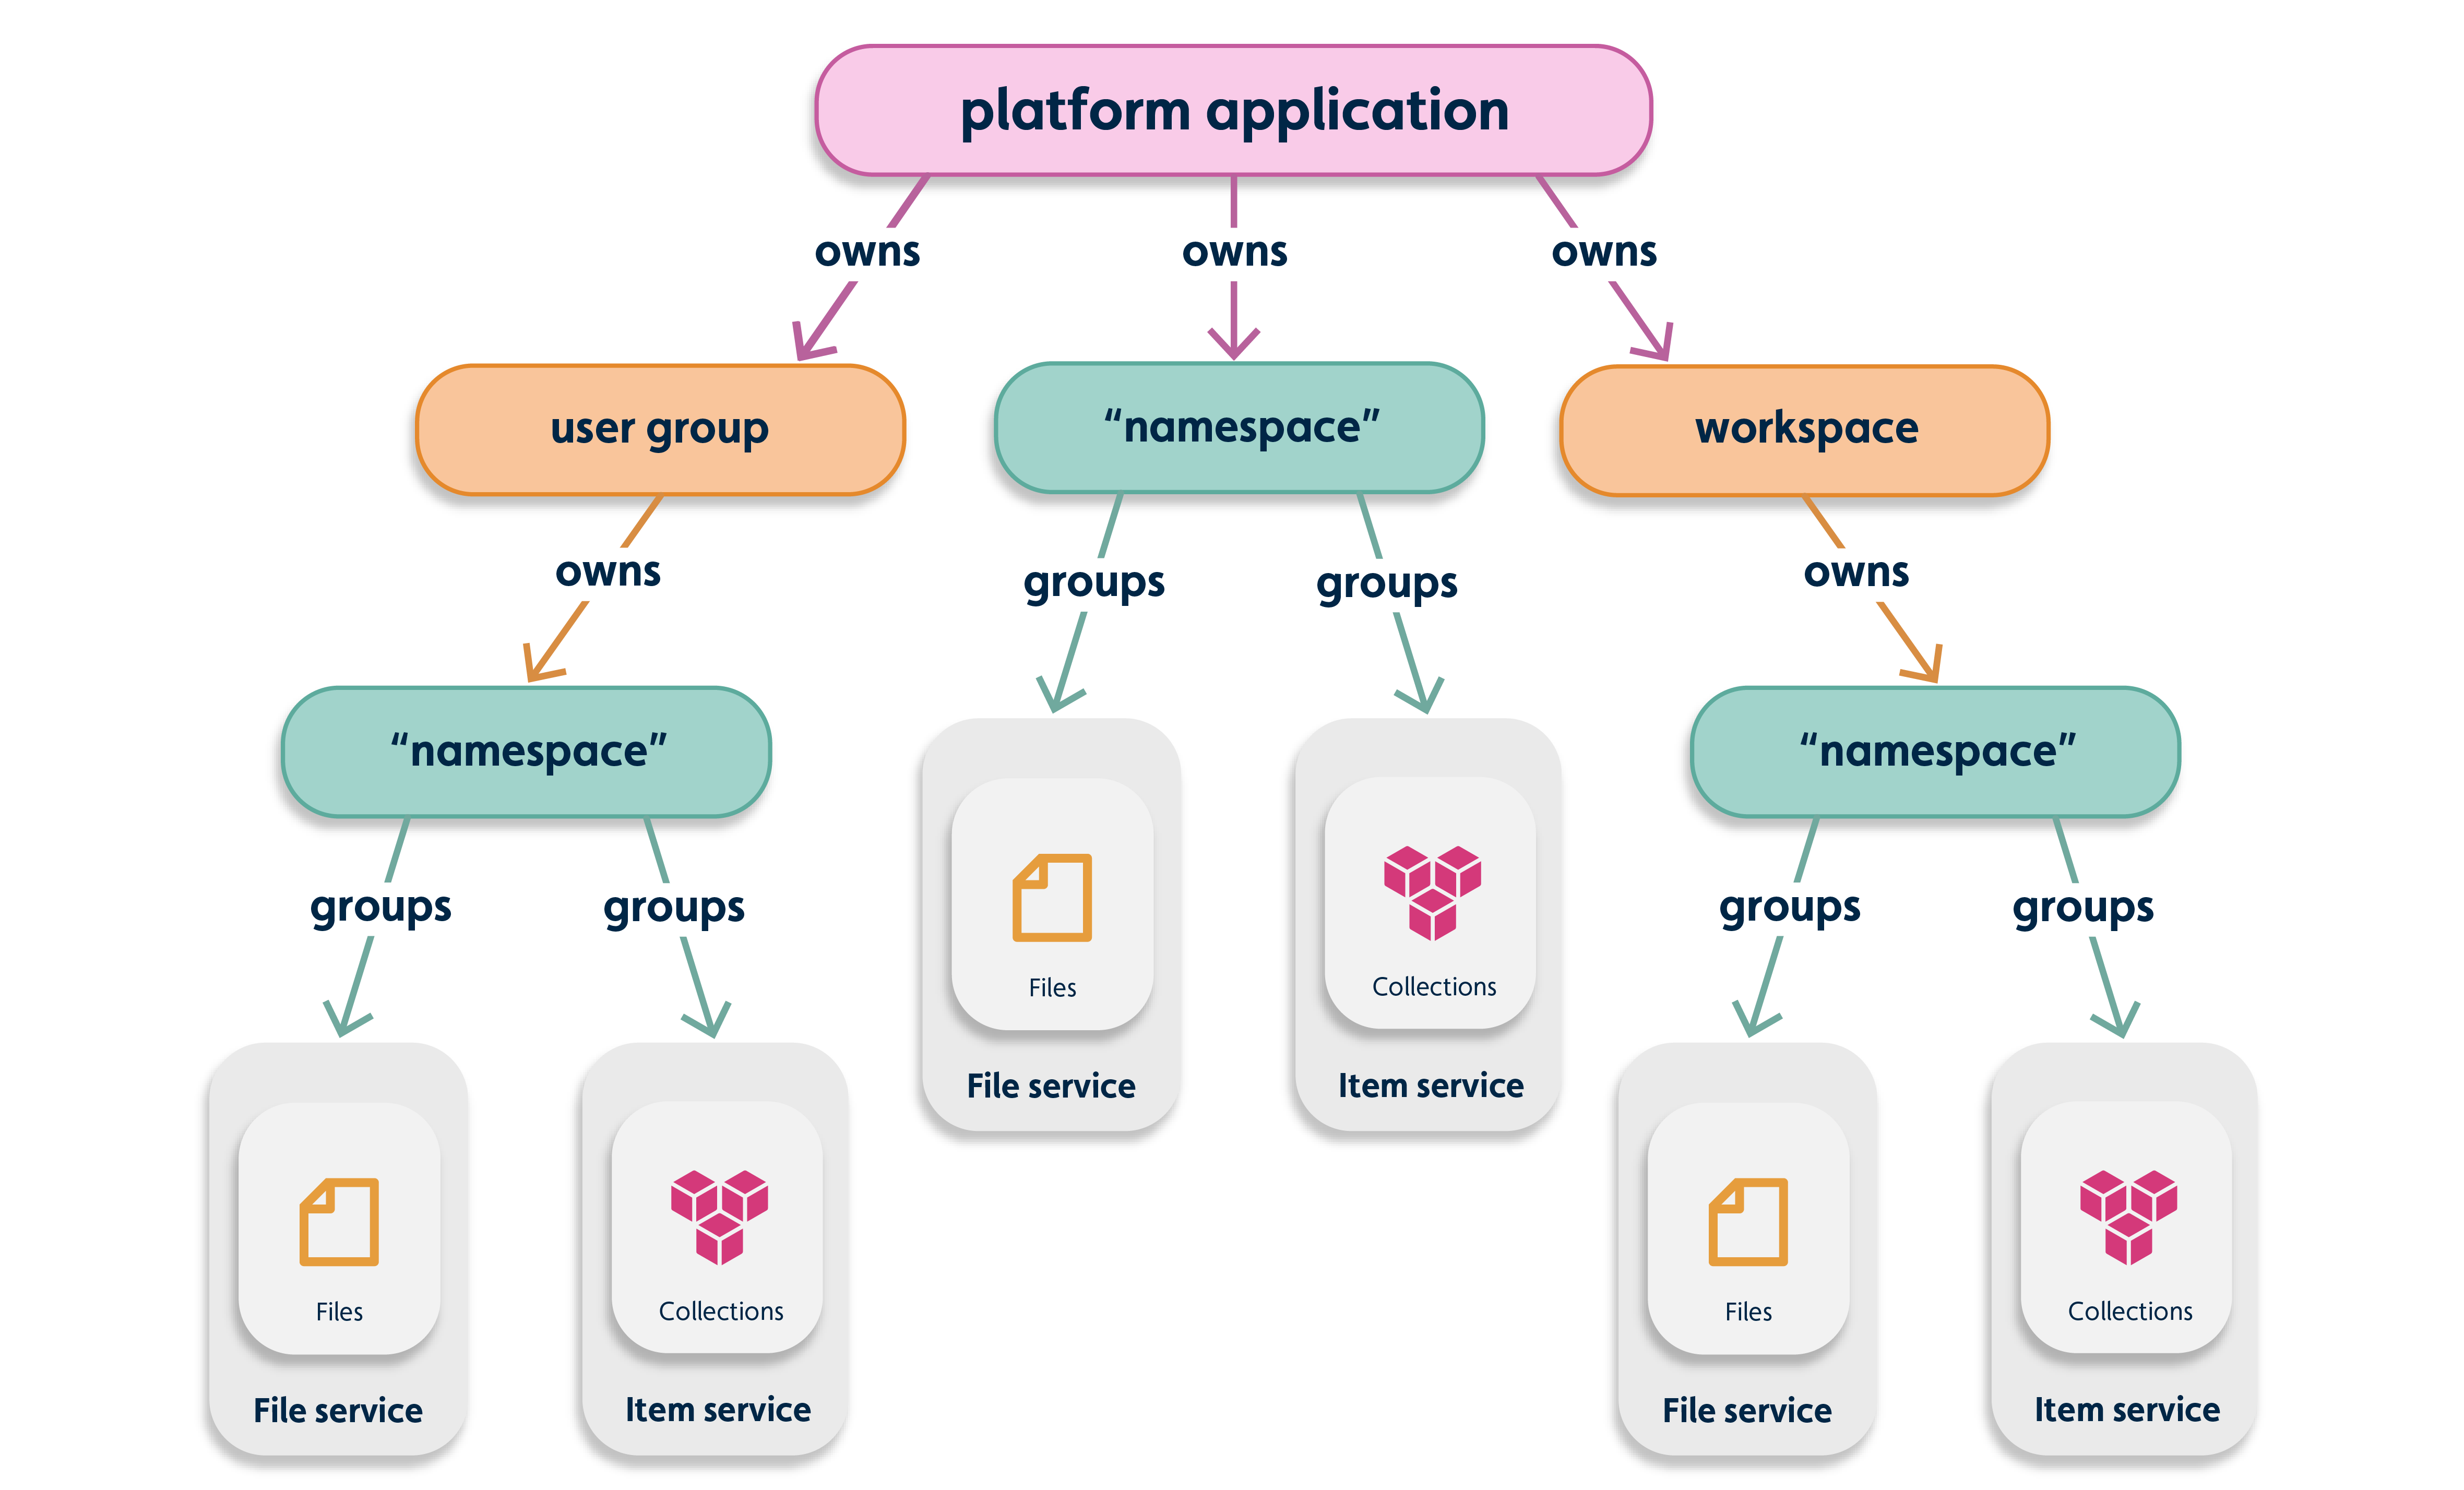
In terms of the Passport Service resource heirarchy, platform Applications are namespace providers that also own Workspaces and UserGroups.
Platform application provisioning#
Important: You cannot provision a platform application directly. Please contact the platform support team to provision the platform application and to grant one user owner permissions.
Platform application owners#
A platform application has one user as its owner and that user has all platform application permissions. Owners can give owner-level permissions to other users or give users permissions to create workspaces and user groups in the application, which have their own namespaces. When a platform application is created, so too is its namespace. You can create application-level resources under this namespace.
When a platform application is provisioned, a platform application owner is assigned. The platform application owner can complete the following actions:
- Add users to the Project Admin user group which grants its members previleges to create workspaces and user groups
- Promote any user in the Project Admin user group to platform application owner using permission APIs, such as the IafPassSvc JavaScript platform API and the Passport Service REST API.
- Platform application owners can customize email notification templates
Basic auth flow for the application and platform#
- Your app makes a HTTP call to get the access_token using user credentials and app details, such as the appId and appSecret.
- The platform returns an access_token to your app.
- For subsequent HTTP calls to various platform APIs, your app includes the access_token in a request header.

Table: Application and platform auth flow key terms
| Keyword | Description |
|---|---|
| appId | Equal to the app’s username. It is passed as the value for retrieving the access_token. |
| appSecret | Equal to the app's password. It is used to retrieve the access_token and refresh token. |
| access_token | Returns after the app is authenticated successfully. The platform uses JSON Web Tokens (JWT), used in subsequent API calls to the platform. It has user and app context by which permissions are executed. |
Authentication#
End users are authenticated through PA using one of the flows.
- OAUTH2 Implicit Grant: Suitable for JS apps that maintains session at client side
- OAUTH2 Authorization Code Grant: Suitable when sessions maintained at server side and requires refresh token
- User Access Keys: Suitable for desktop apps
For more information on setting up single sign-on and SCIM for the platform, see SAML SSO on the platform.
Permissions#
Authentication tokens contain appId and restricted to access resources within the PA. So users should get respective app specific tokens to access the resources.
| PA admin | PA Owner | |
|---|---|---|
| Create workspace/usergroup | Yes | Yes |
| Create/Edit Notification Templates | No | Yes |
| Create permissions for Application | No | Yes |
| Edit Workspaces | Based workspace permission | Based on workspace permission |
| Create permissions for Workspace | Based workspace permission | Based on workspace permission |
| Accessing resources that owned by workspaces | Based workspace permission | Based on workspace permssion |
Application whitelisting#
You can add a whitelist to your application so that tokens generated by your app can also grant access to other applications on the whitelist.
A JWT token generated from your app enables the token to access the resources of other applications on your application’s whitelist. For example, your Classify app can access a file in the Assure app if the Classify app’s appId is listed in the Assure app's _whitelistedApps array.
To add or update a whitelist, use the Edit App method in the Application REST API. The manage admin can update this API to create a whitelist and give developers app EDIT permissions. For more information, see Edit App.
Use the Application API to create a user interface for end-users with permissions to edit the whitelist.
Notification Templates#
Notification templates overview#
A notification template is a HTML template for email messages which are used to inform users that they have been invited to use a platform application. You can easily customize a notification template to suit your particular application.
An example of a notification message would be something like: Administrator has invited you to join the Digital Twin App.
Thare are two types of notification template which can be configured for each application:
- User group invite
- User group invite reminder
Template features#
Notification templates offer the following features:
- They allow entitled users to modify notification templates for invites that are specific to a platform application.
- You can easily customize the HTML and styling of the message.
- They use Velocity, a Java-based templates engine which allows the inclusion of programming logic and variables for dynamic values on each request.
Notification Template HTML#
Here is a sample HTML listing of a notification template.
Note: The content variables are enclosed within
${}. For example, the content for the main body of the message would be contained in${body_content}.
<!doctype html><html xmlns="http://www.w3.org/1999/xhtml" xmlns:v="urn:schemas-microsoft-com:vml" xmlns:o="urn:schemas-microsoft-com:office:office">    <head>                <xml>            <o:OfficeDocumentSettings>            <o:AllowPNG/>            <o:PixelsPerInch>96</o:PixelsPerInch>            </o:OfficeDocumentSettings>        </xml>        <meta charset="UTF-8">        <meta http-equiv="X-UA-Compatible" content="IE=edge">        <meta name="viewport" content="width=device-width, initial-scale=1">        <title>${subject}</title>        <style>            @media only screen and (min-width:768px) {                .templateContainer {                    width: 600px !important;                }            }
            @media only screen and (max-width:480px) {                .templateContainer {                    width: 300px !important;                }                .h1 {                    font-size: 22px !important;                    line-height: 125% !important;                }                .h2 {                    font-size: 20px !important;                    line-height: 125% !important;                }                .p {                    font-size: 16px !important;                    line-height: 150% !important;                }                .logo img {                    width: 100% !important;                }            }        </style>    </head>   <body style="background-color: #fafafa;">        <div class="templateContainer" style="margin: 40px auto; width: 600px; border-radius: 25px 25px; background-color: #FFFFFF; padding-top: 24px; background-size: cover; background-position: center;padding-bottom: 64px;">            <div style ="padding: 9px; text-align: center;" class="logo">                <img align="center" alt="" src="${host}/fe/images/logo.svg" width="321.47999999999996" style="max-width:1200px; padding-bottom: 0; display: inline !important; vertical-align: bottom;border: 0; height: auto;outline: none; text-decoration: none;" class="img">            </div>            <div class="content" style="padding-top: 0; padding-right: 18px; padding-bottom: 9px; padding-left: 18px; color: #333333; font-family: Helvetica; font-size: 18px; line-height: 150%; text-align: left;">                <div style="padding-top: 9px;">                    <h1 class="h1" style="display: block;margin: 0;padding: 0;color: #333333; font-family: Helvetica; font-size: 30px; font-style: normal; font-weight: bold; line-height: 150%;letter-spacing: normal;text-align: center;">${body_header}</h1>                    <h2 class="h2" style="display: block;margin: 0;padding: 0; color: #c71784;font-family: Helvetica;font-size: 30px;font-style: normal;font-weight: bold;line-height: 125%;letter-spacing: normal;text-align: center;">${name}</h2>                </div>                                <p class="p" style="margin: 10px 0; padding: 24px 48px;">                    ${body_content}                </p>            </div>            <div style="margin: 0 auto; text-align: center;">                <span class="button" style=" text-align: center;border-collapse: separate !important; border-radius: 11px; background-color: #C71784; font-family: Arial; font-size: 18px; padding: 24px; display: inline-block">                    <a  title="Join Now" href="${invite_link}" target="_blank" style="font-weight: bold;letter-spacing: normal;line-height: 100%;text-align: center;text-decoration: none;color: #FFFFFF;">Join Now</a>                </span>            </div>        </div>    </body></html>
More information on notification templates#
For more information on creating and editing notification templates, see Notification Template console.
For more information on using notification templates in the API, see Notification Templates in the Passport Service REST API.