Exporting a Revit model
Overview#
Since Platform version 5.1, you now have more options for exporting Revit models, namely:
- Export 2D and 3D detailed models (as in previous versions)
- Export an outline model (new to Platform version 5.1)
How to export a 2D or 3D Revit model#
To export a 2D or 3D detailed model, do the following:
In the Revit app, to set your project to 3D view, on the View tab, in the ribbon, click the 3D View icon.
Note: This method activates the default 3D view. You can select another 3D view for export with the Revit project browser.
From the plug-in main page, click the project you want to export, then click Upload.
Note: If it is a new project and it doesn't appear, click the Refresh button.
Note: If the level of detail is not set to fine, a pop-up appears for you to confirm this choice. For more information on the appropriate, level of detail for your project, see View level of detail. If you want to change the level of detail to Fine, on the toolbar, at the bottom of the 3D-view page, from the checkered Level of Detail icon, select Fine.
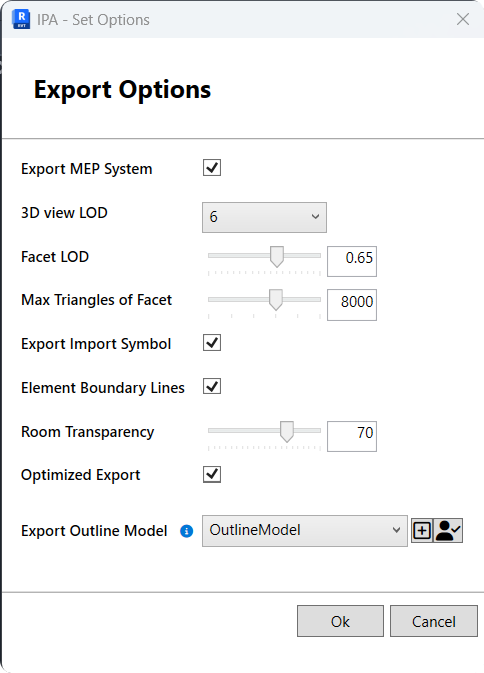
In the Export Options dialog box, select your export options, then click OK. For more information, see Export options dialog box.
In the Select 2D Views dialog box, select the 2D views you want in your model, such as floor plans, sections, and elevation views, then click OK. The upload starts.
Note: The 2D views feature is only available for Revit2020 and later.
Note: If there is an error in your upload, you can find more information on the error in the log file in the following location: . For additional assistance, send the log file to your support team.
To load the model in your digital twin application, complete the following steps:
a. Open your digital twin application.
b. On the sidebar, click the Manage Models icon.
c. From the Select Model drop-down, select your model.
d. From Select Model Version, select the checkbox of the version you want.
Note: When the upload is complete, you can also find the BIMPK file in your Temp folder.
How to export an outline model#
Outline building models are a feature of the new Federated Model View, which was introduced to the IafViewer in Platform version 5.1. The outline model is the outer shell of a building and will be used by the GIS view of the Platform viewer.
Figure: Export Options dialog
To export an outline model. do the following:
To prepare for export an outline model, you first need to prepare one 3D view. In Outline-Model view, only show necessary elements. It can be done via setting visible linked files for this view, and selecting the Revit categories to be visible, such as walls, floors, windows, doors, roofs, curtain panels,and mullions.
Create Scope boxes and use them to scope the shell elements of the BIM model.
In the Export Options dialog, look for the option at the bottom of the dialog, Export Outline Model. In the drop-down list, look for the 3D view for outline model export.
If the option OutlineModel is not listed then note the Create OutlineModel view button to the right of Export Outline Model (marked with a plus symbol). Click this button to create an outline model view based on the selected 3D view for model export.
Figure: Export Outline Model buttons

Now in the Export Outline Model drop-down list, you will see a new option OutlineModel. Select this option for outline model export.
Click OK to continue model upload.
Now select a 2D view if required. This step is optional.
The plug-in will now begin the model exoort. It will first generate a Bimpk file. The plug-in will then export the outline model to a .glb file, and then add that .glb file into the Bimpk file. The Outline Model will then be uploaded to the platform via Bimpk.
Previewing Outline Model before export#
To the right of the Create OutlineModel view button, is the Preview Outline Model export button (indicated by a figure of a person). Click this to do a quick export which will give you a preview of the Outline Model before uploading to the Platform. Adjust the view as nececssary until it is suitable for export.
Figure: Export Outline Model buttons
Notes on exporting outline models#
Note the following:
Export outline model is an additional option to 2D and 3D model export, and is optional.
If you do not select 3D view for outline model export, the outline model will not be exported.
By default, the plug-in will search default Outline Model view for outline model export based on the selected 3D view for model upload. If the default view exists, the plug-in will automatically select it.