Export options dialog box
Overview#
The Export Options dialog box allows you to set your export settings. When you click Upload, the Export Options dialog box appears.
Note: Any changes you make to the export options do not persist and are only valid for the current session. If you re-launch the Revit app, the export options return to their default values.
Figure: Export Options dialog box
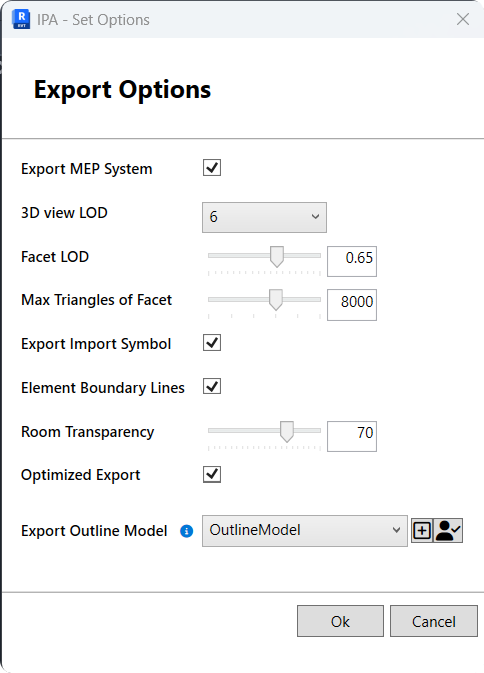
Export options settings#
| Option | Description | Value range | Default value |
|---|---|---|---|
| Export MEP System | Output MEP System data, System-Equipment relationship, and System-connection relationship. | Enabled or disabled | Enabled |
| 3D View LOD | Adjust the view’s Level of Detail value. A higher value results in a higher tessellation level, increasing the ammount of triangles in an element’s mesh data. | 1 to 10 | 6 |
| Facet LOD | Adjust Level of Detail value for non-plain face tessellation. A higher value results in a higher tessellation level, which determines the ammount of triangles in an element’s mesh data. | 0.1 to 1.0 | 0.65 |
| Max Triangles of Facet | Set the upper limit of triangle numbers for face tessellation. | 5000 to 10000 | 8000 |
| Export Import Symbol | Export the Import Symbol. | Enabled or disabled | Enabled |
| Element Boundary Lines | Enable or disable output element boundary lines. To not export element boundary lines, set Element Boundary Lines to false. | true or false | true |
| Room Transparency | Slide the bar to adjust the transparency of room geometry exported to HOOPs .scz files in Bimpk. If a room is not easy to see, adjust transparency to lower values. | 0 to 100 | 70 |
| Optimized Export | Enable to export your model with the latest performance improvement features. For more information, see Model composition for the IafViewer. Some projects might not be suitable for the latest export features - if not, you can disable this option. | Enabled or disabled | Enabled |
| Export Outline Model | Select one 3D view for Outline Model export | Enabled | None or 3D view. Default value: If default 3D view is used for the model export, then the plug-in will search for ‘OutlineModel’ view. If that exists, it will be automatically selected. If other 3D view is used for export, then the plug-in will search for <view name>_OutlineModel view. If that exists, it will be automatically seleceted. If default OutlineModel view is not found, then the value will be empty. |
| Export Outline Model- Create OutlineModel view button | Creates OutlineModel view if it does not already exist. OutlineModel view is based on the 3D view selected for model upload. It shows just elements of selected Revit categories such as walls, floors, doors, windows, roofs, curtain panels, curtain mullions, topography, and Scope Box. | Enabled | |
| Export Outline Model - Preview Outline Model export button | Once OutlineModel view is selected, before uploading to Platform, you can try to export it and preview the result in a .glb file. The OutlineModel .glb file should be lightweight as much as possible. Check the .glb file size. Best to ensure that it is smaller than 30 MB, otherwise it could impact rendering performance in the GIS environment. You can also use the glTF viewer to check if the OutlineModel .glb file is suitable for for the exterior look of the BIM model. | Enabled |