IafViewer GIS (Mapbox)
GIS feature overview
The Geographic Information System (GIS) feature in the IaFViewer was introduced in Platform version 4.6.
The GIS feature integrates geospatial capabilities into BIM visualization which enables you to place BIM models on a real-world map using latitude and longitude coordinates.
You can then easily align and interact with the BIM models as needed. This facilitates the seamless coordination of project elements with real-world geographic context, enhancing spatial awareness and analysis.
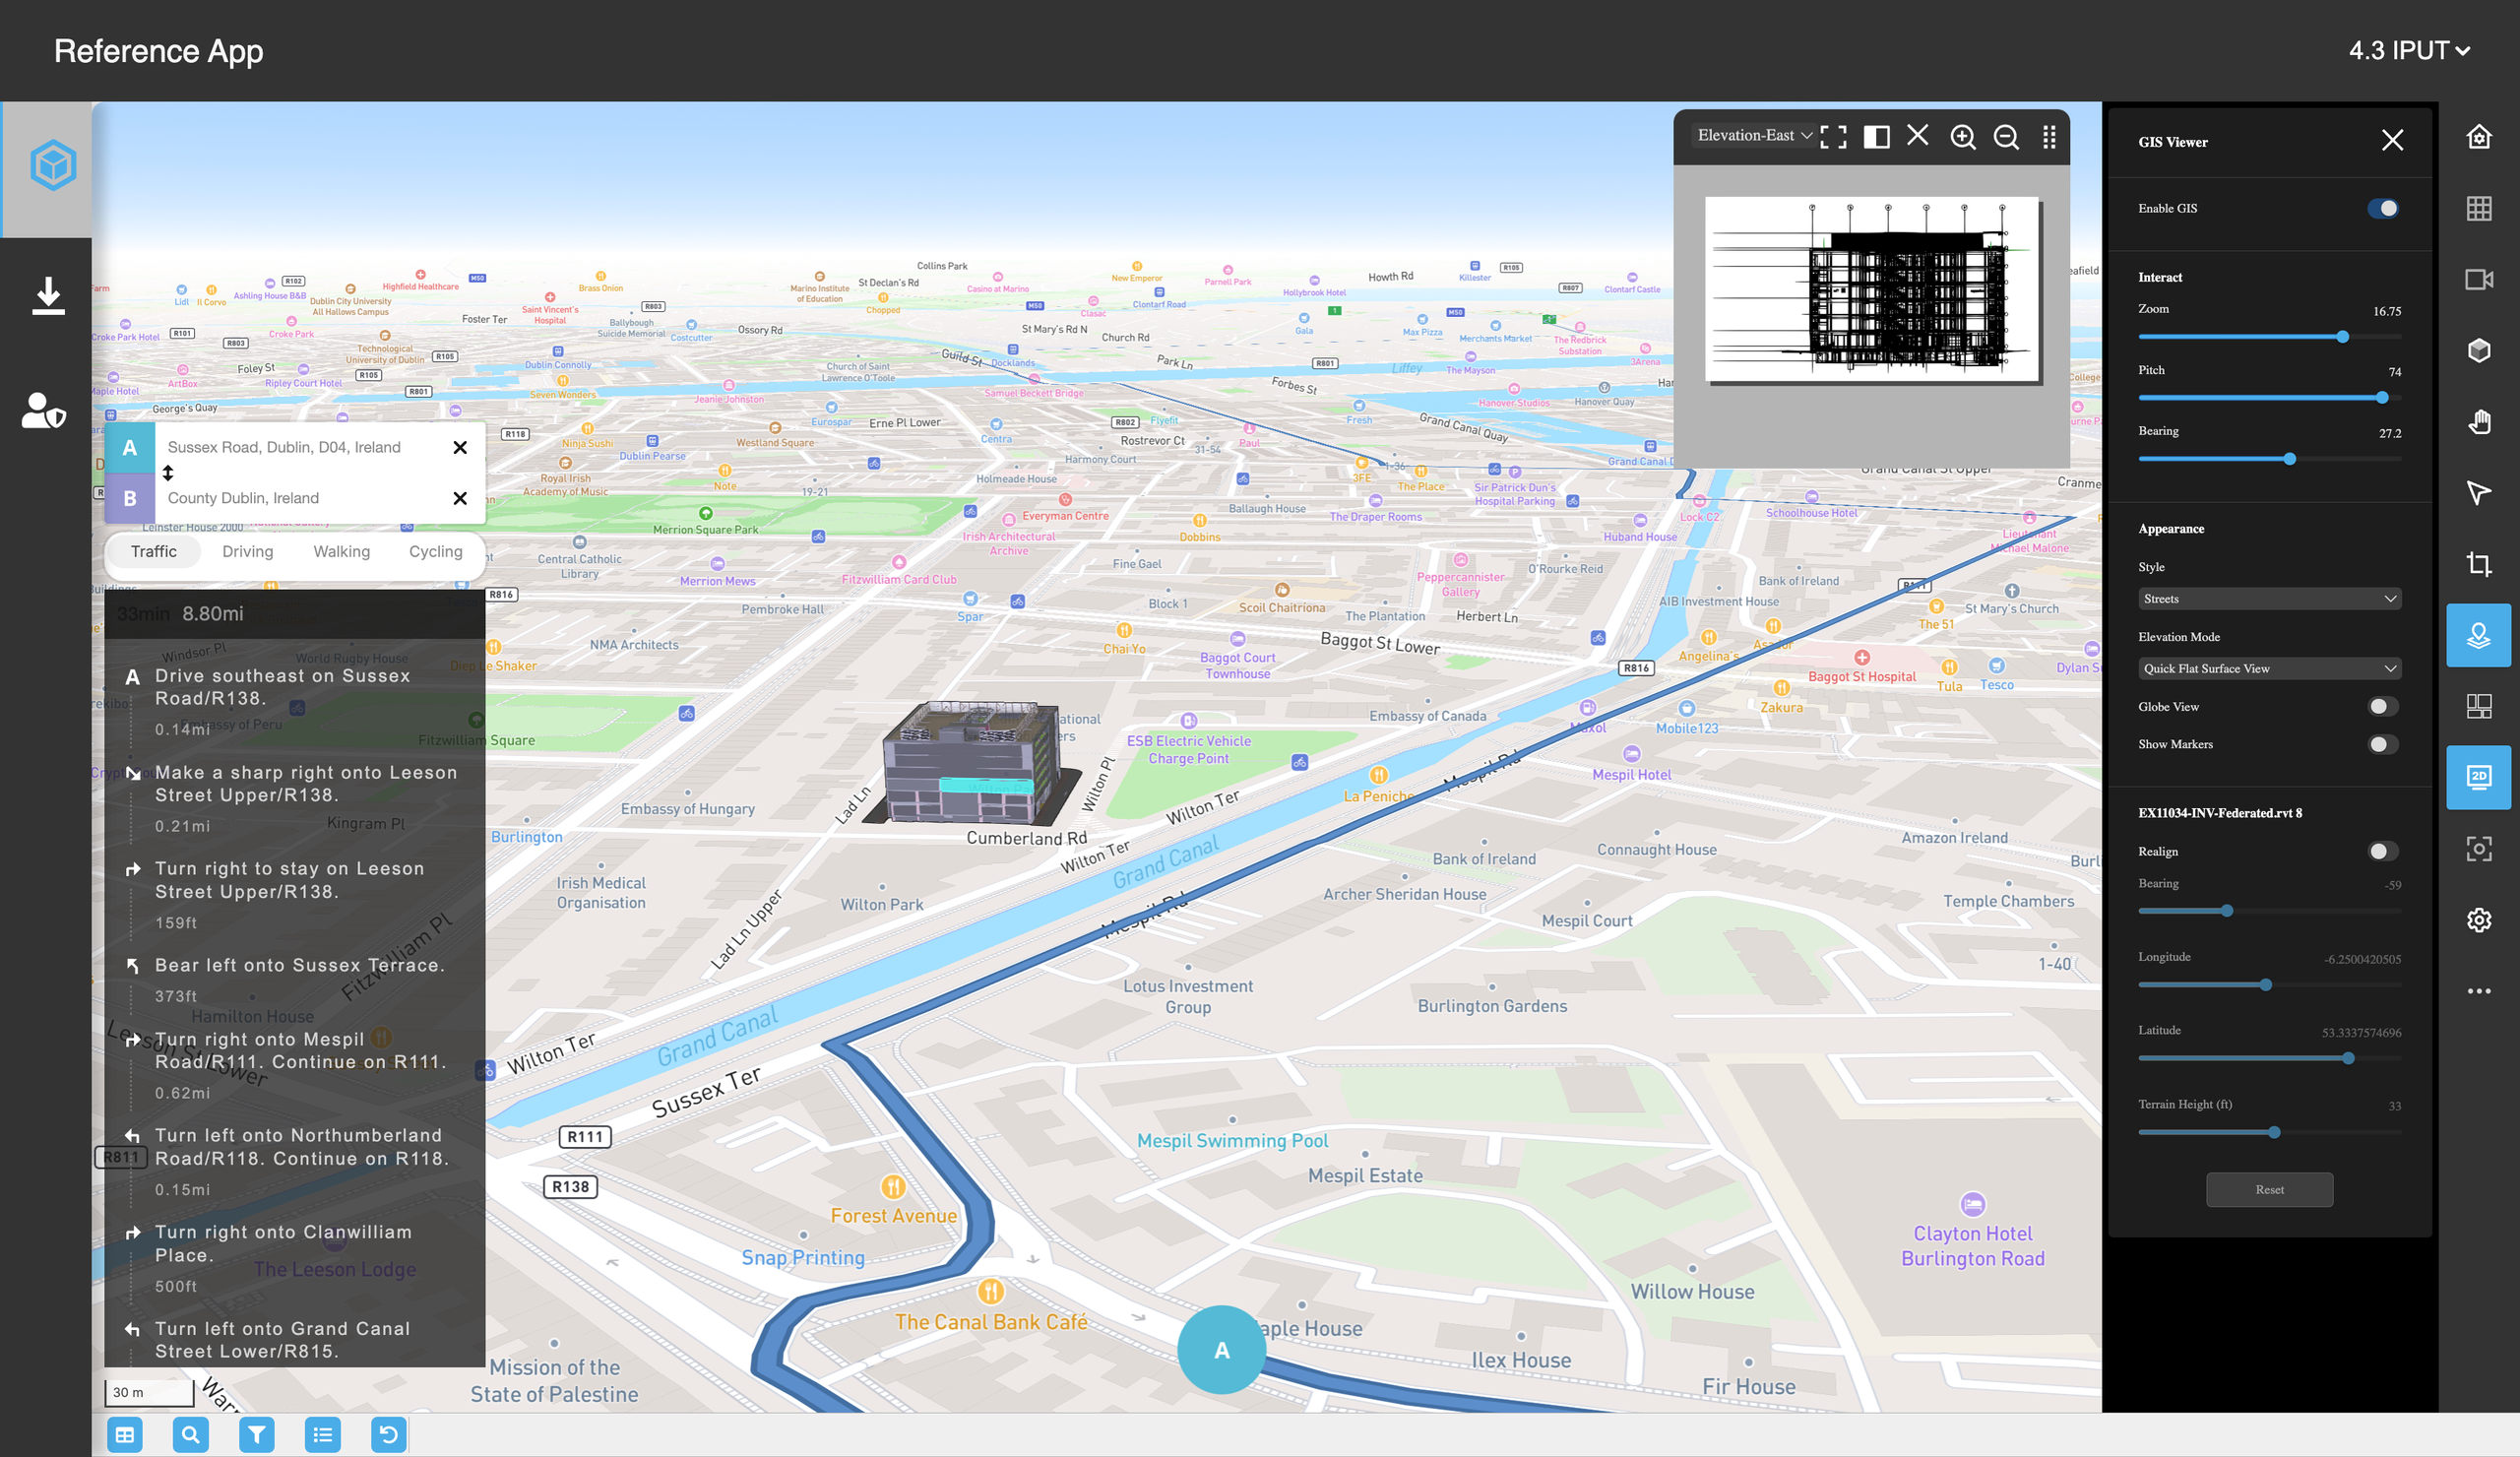
Figure: Reference app with GIS enabled
Mapbox
The IafViewer uses Mapbox to view building models on a GIS map. Mapbox is a location platform technology used by developers. For more information, refer to the Mapbox site.
Mapbox uses temporary tokens to access map information. For more information on this, refer to the page on Reference App API tokens.
Core components
GIS is a top-level prop group on {{IafViewerDBM}} ({{gis}}), not nested under {{view3d}}. It overlays 3D models on a Mapbox-powered map at geo-locations.
Applications integrating GIS must supply a valid Mapbox token (token), handle token lifecycle (generation, refresh, expiration), and ensure compliance with Mapbox’s licensing, usage limits, and terms of service.
| Prop | Type | Purpose | Default |
|---|---|---|---|
gis.enable | boolean | Enable/disable GIS | false |
gis.visible | boolean | Show or hide the enabled widget without turning the mode off. When false, the launcher can still open the widget if showLauncher is true. | true |
gis.token | string | Mapbox access token (app-provided) | undefined |
gis.opacity | number | Map layer opacity (0.0 to 1.0) | 1.0 |
gis.displayMode | enum | DEFAULT, SPLIT, FULLSCREEN, FIXED | FULLSCREEN |
gis.showToolbar | boolean | Show/hide the GIS widget's own toolbar | false |
gis.showLauncher | boolean | Show/hide the main-toolbar button that opens the GIS viewer | true |
gis.alignment | enum | LEFT_TOP, LEFT_BOTTOM, RIGHT_TOP, RIGHT_BOTTOM. Applies only to SPLIT and FIXED. | RIGHT_TOP |
gis.order | number | Display order when several widgets are shown | 0 |
gis.margin | number | Margin around the widget | 0 |
gis.federatedMode | enum | None, Outline, Dynamic, Markers — see Federated Mode | Outline |
gis.initial.enableOverlay | boolean | Set to false when your application shows the detailed model in a separate widget. See APS models on Mapbox. | true |
gis.initial.clusterLoadMode | enum | Replace (reference model only) or Incremental (all models in the active cluster load together) | Replace |
gis.initial.zoom, gis.initial.bearing, gis.initial.pitch, gis.initial.center | number, object | Starting map view before saved GIS data loads. center is { lng, lat }. Omitted fields keep their defaults. | zoom 16, bearing 0, pitch 60 |
gis.primaryModelId | string | Reference model for alignment | undefined |
gis.elevationMode | enum | None, QuickSurface, QuickUnderground, Surface, Blend, Underground | None |
gis.dynamicRenderingDistance | number | Scales the distance from the map center at which the viewer switches between the detailed model, the outline, and markers | 750 |
gis.dynamicRenderingZoom | number | Offset to the map zoom at which the viewer switches to the detailed model. Higher values need a closer zoom. | 14 |
gis.showMapMarkers | boolean | Show location markers on map | true |
gis.showModelTitles | boolean | Show the model name below each location pin. Users can also change this in the viewer. | true |
gis.styling | object | Marker overrides: icon (primary, secondary, center pin colors), layer (marker, title), and tooltip (CSS for the hover box). An empty object keeps the built-in look. | {} |
gis.enableLocationTooltipOnHover | boolean | Add latitude and longitude below the title in the marker hover tooltip | true |
gis.debug | object | Diagnostic origin labels. See Origin labels. | All off |
gis.onIafMapReady | function | Callback when map ready (proxy access) | undefined |
gis.onCreateMarker | function | (properties) => HTMLElement to replace the built-in pin | — |
gis.onFederatedModeChanged | function | (federatedMode) => void when federated mode changes | — |
gis.onReferenceModelChanged | function | (modelId) => void when the primary model changes | — |
gis.onElevationModeChanged | function | (elevationMode) => void when elevation mode changes | — |
gis.onModelSelect | function | (modelId, eventType, modelIds) when a marker is clicked or double-clicked | — |
gis.onOutlineLoaded | function | (modelIds) => void when outlines finish loading | — |
gis.onLongitudeChange, gis.onLatitudeChange, gis.onBearingChange, gis.onAltitudeChange | function | (modelIds, value) => void when a model's alignment value is committed (sliders, search, drag end, reset) | — |
For the full prop reference with required flags, see IafViewer — GIS (mode object tables) and IafViewerDBM (DBM forwards the same gis props). For multi-building map composition (federation type, clusters, federated mode), see Federated View3D Buildings on Gis(Mapbox).
APS models on Mapbox
You can place APS designs on the Mapbox map alongside models (GeoBIM). Add APS clusters to {{modelComposition.clusteredModels}} with evmMode: 'aps'. For the cluster format, see View3D and APS clusters.
The map shows each APS design as a GlbDraco outline from APS Extra Derivatives, oriented by its placement plane. To control the outline mesh quality, set {{aps.config.modelOutlineQuality}}. If no outline is available, the map shows a marker instead. For more information on APS mode, see IafViewer APS.
Showing the detailed model in a separate widget
To show the detailed model in its own widget, such as Geo BIM side by side, set {{gis.initial.enableOverlay}} to false. It also resolves to false when any APS cluster is present. When overlay is off:
- Reference Model, Rendering Distance, and Rendering Zoom stay visible but disabled.
- The federated-mode dropdown omits None and Dynamic and switches to Outline.
- Double-clicking a model doesn't make it the reference model, but
onModelSelectstill fires.
Responding to marker selection
{{gis.onModelSelect(modelId, eventType, modelIds)}} fires for both 'click' and 'dblclick'. It fires even when View3D is disabled, so a GIS-only map can tell your application which building to open. modelIds lists every marker under the pointer, including IDs and APS IDs. Filter it in your application.
Origin labels
For diagnostics, you can show origin labels on the map with {{gis.debug.showGisAnchorLabel}}, {{gis.debug.showOutlineModelOriginLabel}}, and {{gis.debug.showAxisOriginLabel}}, which all default to false. {{gis.debug.originLabelDisplay}} sets what the labels show: 'geo', 'model', or 'both' (the default).
Related examples
| Example | Shows |
|---|---|
IafViewerExGeoBimAps | APS clusters placed on Mapbox with side panes |
IafViewerExGeoBimView3d | Mapbox and View3D side by side with resizable splitters (gis.initial.enableOverlay: false) |
Loading and aligning a BIM project
When a BIM project is first loaded, it is not geolocated correctly and defaults to a pre-set longitude and latitude within a country.
To position the model accurately in a real-world setting, you need to do the following:
- Set longitude and latitude co-ordinates: Defines the precise geolocation of the building.
- Set the bearing and tilt: Adjusts the orientation and angle of the model.
- Specify the elevation (in feet): Determines how much of the building is positioned above or below the terrain ground level.
- Carry out individual alignment: Each building requires individual alignment for accurate placement.
Launching the GIS feature
To launch the GIS feature, do the following:
-
Click the GIS Launcher icon in the toolbar on the right of the Model Navigator page.
-
The GIS configuration pane will appear. Click the Enable GIS switch button to activate the GIS features.
GIS Enabled IafViewer - Interaction pane
The GIS Interation Pane allows you to dynamically adjust the camera view in the GIS environment.
It consists of three primary controls:
- Zoom
- Pitch
- Bearing
The three actions (Zoom, Pitch, and Bearing) affect both the 3D model and the underlying GIS map. Adjustments made via the Interaction pane are synchronized so that both the model and the map reflect the same spatial perspective. This ensures consistent and accurate navigation throughout the application.
When you embed {{IafViewerDBM}} with both GIS and View3D enabled, keep camera control inside the viewer. Do not call Mapbox camera methods (for example setCenter / flyTo on the raw map) or drive the View3D camera from app code independently of the map — that desynchronises the two views. Prefer GIS UI and federated controls, or observer callbacks such as {{view3d.onCameraUpdate}} if your app needs to mirror camera state elsewhere.
Figure: Flow Diagram - GIS and View3D camera sync
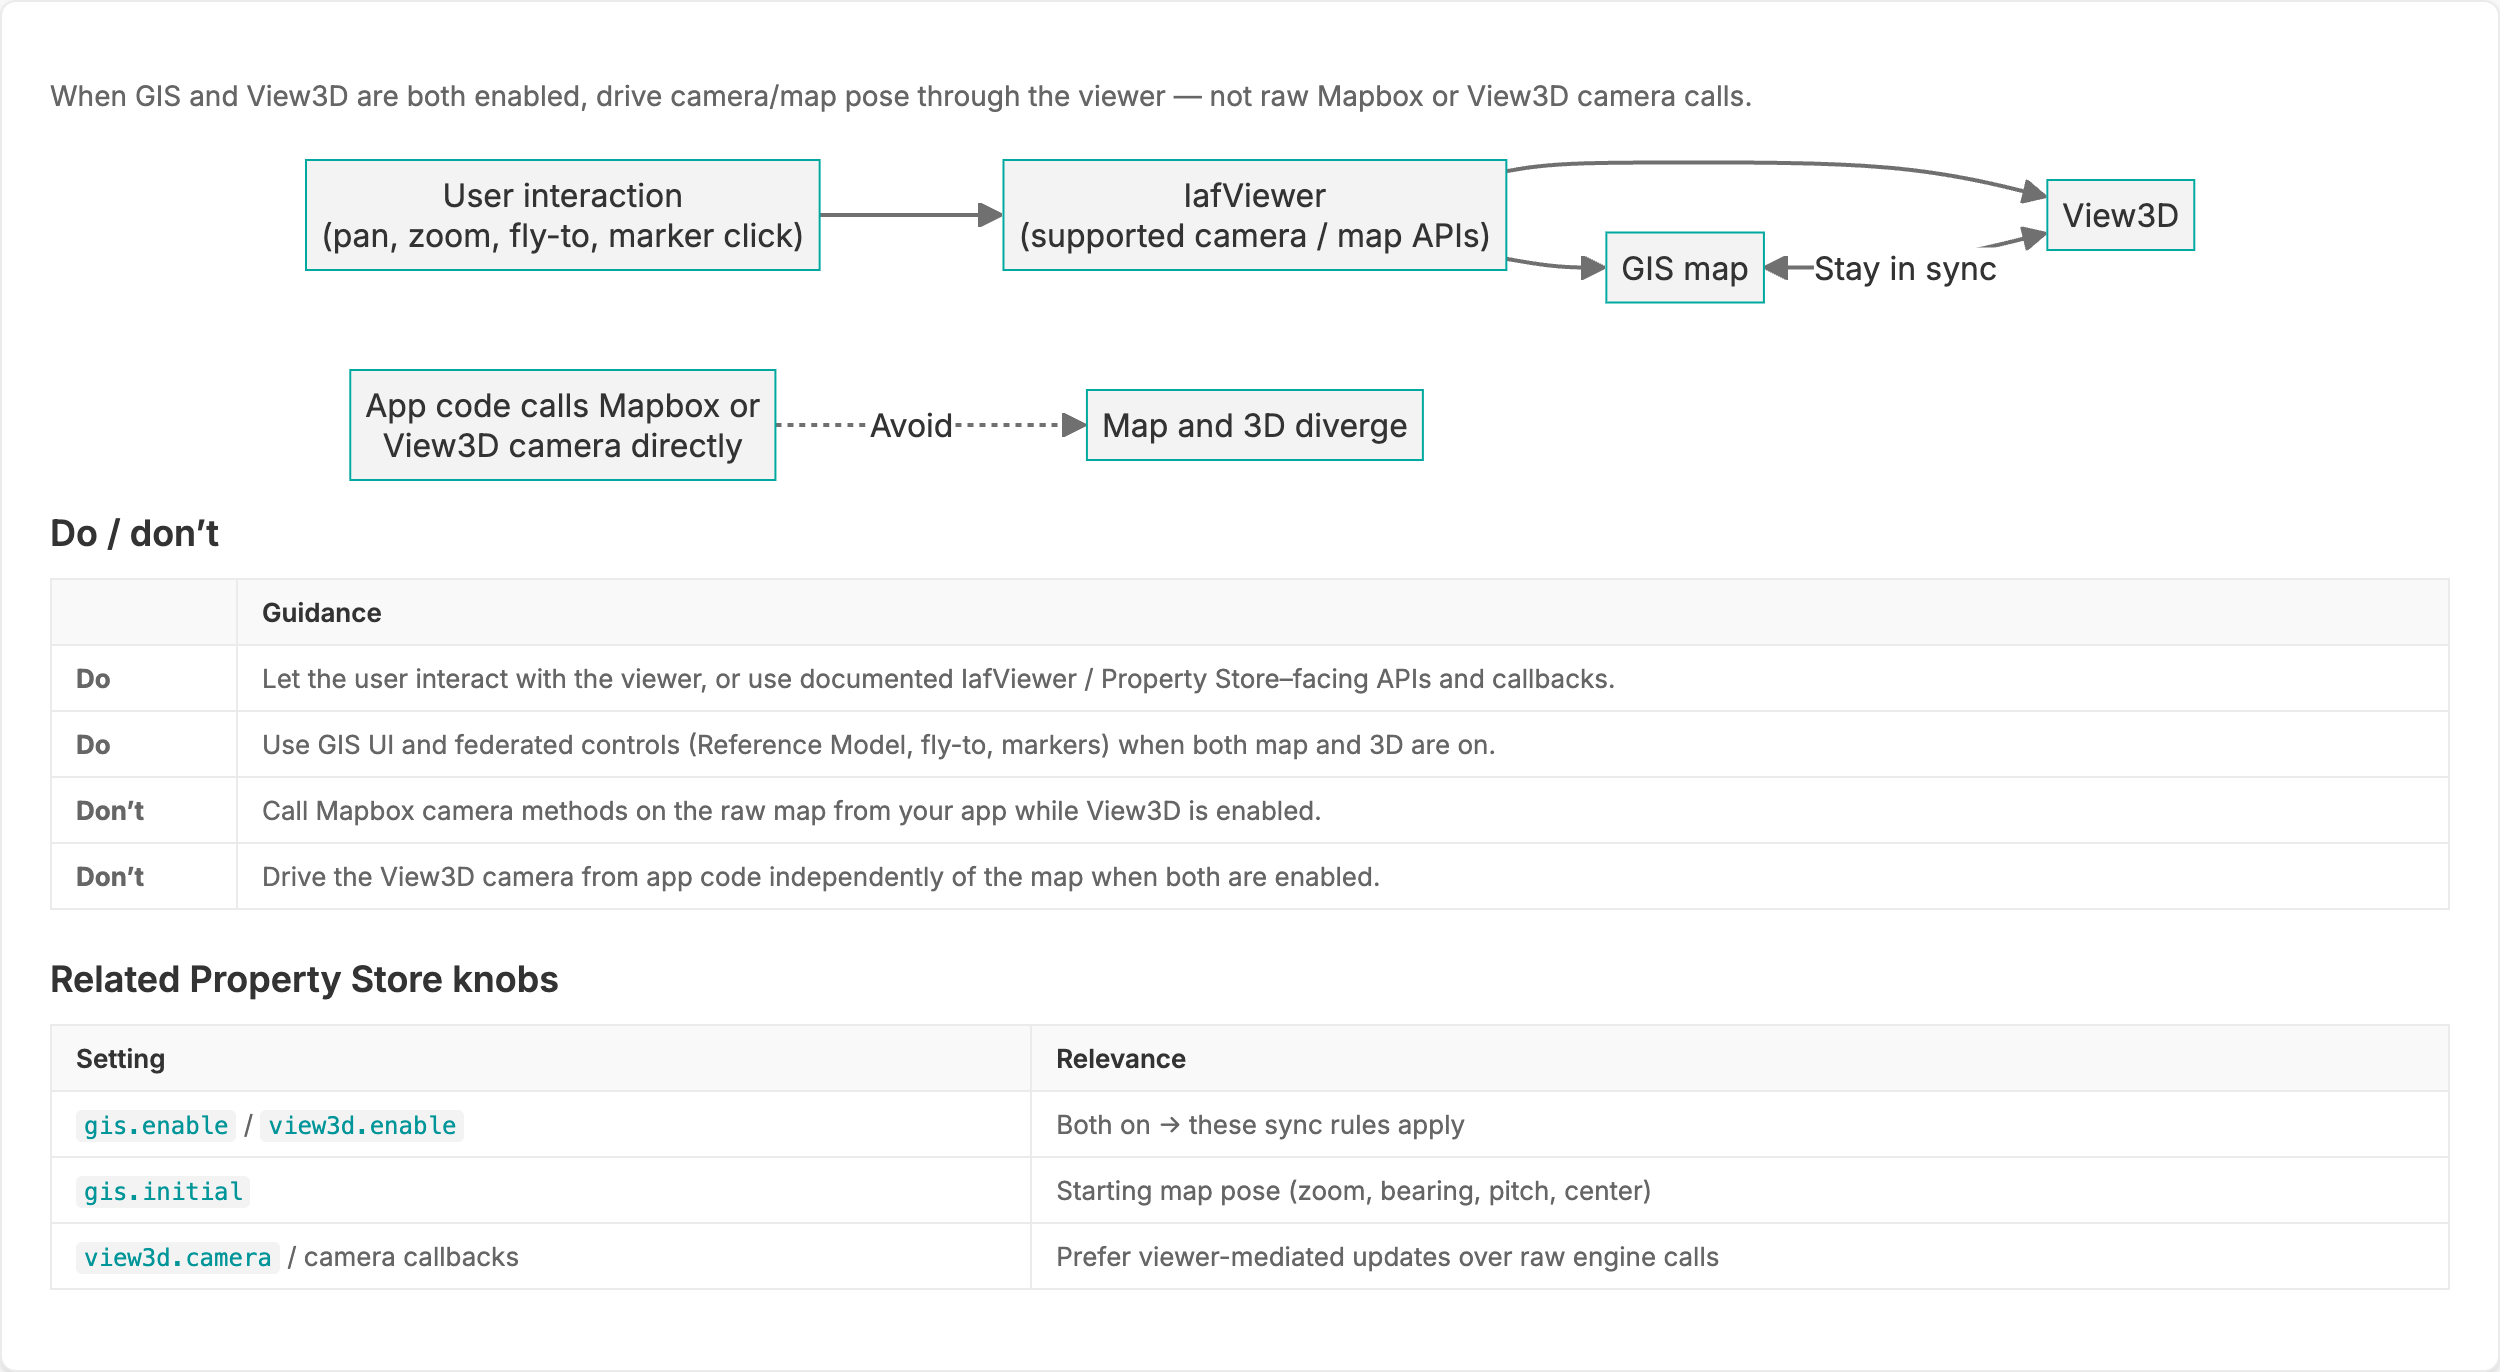
For a worked federated example of this rule, see Federated View3D Buildings on Gis(Mapbox) — camera guidance.
Figure: GIS Interaction pane
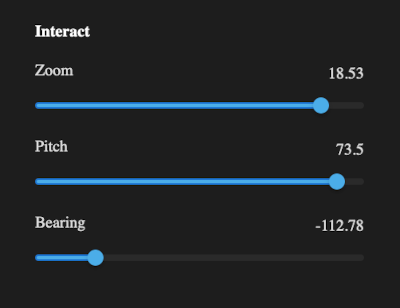
GIS Interaction pane primary controls
Zoom control
The Zoom control determines how close or how far the camera is from the model or map surface.
Note the following guidelines:
- Range: Typically 0 (furthest) to around 22 (closest). Exact limits may vary by map style.
- Lower values: Offers a broad, distant view of the map.
- Higher values: Zooms in closely to reveal finer details of the building or site.
Pitch control
The Pitch control adjusts the tilt of the camera relative to the map's surface.
Note the following guidelines:
- Range: Typically, 0° (looking straight down) to around 85° (near horizontal). Effect:
- Lower values: Lower Values (0°–30°): More top-down, “bird’s-eye” perspective.
- Higher values: Higher Values (30°+): More oblique angle, enabling a horizon view of the building in the GIS context.
Bearing control
The Bearing control rotates the camera around the vertical axis, altering the compass direction in which you are facing.
Note the following guidelines:
- Range: Typically -179° to 180°
- Positive or negative values: Changes the orientation of the map, letting you face north, east, south, or west (and anywhere in between).
GIS Enabled IafViewer - Appearance/Display settings pane
The Appearance/Display settings pane provides controls for customizing the visual presentation of the map and BIM models.
Appearance settings
Figure: Appearance settings pane
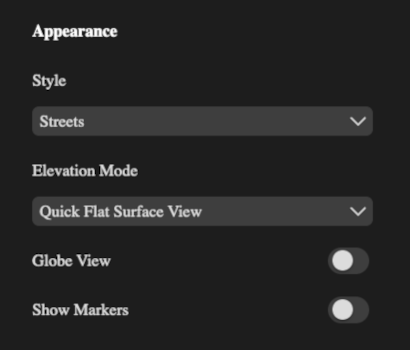
The Appearance settings pane provides controls for customizing the visual presentation of the map and BIM models.
In this pane, you can change the following settings:
- Style
- Elevation Mode
- Globe View
- Show Markers
Style setting
The purpose of the Style setting is allow the selection of different maps styles which define the look and feel of the map's terrain and road networks.
For the Style: setting, common values include
- Streets
- Satellite
- Outdoors
- Light
- Dark
Note that changing the Style value immediately updates the map background, roads, and terrain presentation. BIM models remain in place, but their surrounding environment adopts the chosen style.
Elevation mode setting
The purpose of the Elevation Mode setting is to determine how above-ground and below-ground elements are rendered.
Changes to the elevation mode will alter how much of the building is visible above or below the map's surface. It is useful for analyzing underground utilities or verifying building foundation depths.
Common values for the Elevation Mode include:
- None - All elements are rendered the same regardless of level.
- Quick Flat Surface View - Displays the terrain as a flat surface, making underground elements appear clearly beneath the building.
- Quick Flat Subsurface View - Displays the terrain as a flat surface, making overground elements appear clearly above the building.
Globe View setting
The Globe View setting button toggles between a building view (flat view) and a global (3D) view of the Earth.
When set to ON, the Globe View helps visualize large-scale geography and indicates the building project's position relatve to entire countries or continents. When not turned on, the flat view is ideal for detailed, close-up inspections of the building site.
To summarize, the Globe View setting behaves as follows:
- ON: Displays the map as a globe, allowing you to see the project's location on a 3D model of the Earth.
- OFF: Displays a closer view of a building site, with the default view being the primary building.
Show Markers setting
The Show Markers setting button toggles the visibility of markers on the map. These markers can indicate things such as buildings belonging to the active project, the reference point, or the centre of orbit.
Markers can help orient buildings or label specific buildings in relation to a reference point. However, turning off markers can reduce visual clutter while focusing on building geometry or terrain details.
To summarize, the Show Markers setting behaves as follows:
- ON: Displays all configured markers on the map.
- OFF: Hides markers, providing a cleaner view of the terrain and building models.
Geo Referencing/Alignment controls
Horizontal alignment
Every building in the project can be realigned independently using a range of controls for precise geopositioning.
Figure: Alignment settings pane

| UI element | Description |
|---|---|
| Horizontal alignment (2D) | Toggle on to use the horizontal alignment controls; toggle off to save the alignment to the database. |
| Bearing | Enables or disables horizontal alignment controls. |
| Horizontal alignment (2D) | Enables or disables horizontal alignment controls. |
| Horizontal alignment (2D) | Enables or disables horizontal alignment controls. |
| Horizontal alignment (2D) | Enables or disables horizontal alignment controls. |
Horizontal alignment (2D)
Toggle on to use the horizontal alignment controls; toggle off to save the alignment to the database.
Bearing
The Bearing setting specifies the rotation of the building around the vertical axis on Earth's surface. It has the effect of adjusting the building's orientation (north-south-east-west) relative to the map.
The range of this setting is typically between -179° to 180°.
Longitude
The Longitude setting defines the east-west position of the building. Changing this value will move the building horizontally. The value is formatted in decimal degrees, for example, -6.2504020505.
A positive change in this value will move the building to the east, whereas a negative change will move the building to the west.
Latitude
The Latitude setting defines the north-south position of the building. Changing this value will move the building veritically (north/south). The value is formatted in decimal degrees, for example, 53.3337574696.
A positive change in this value will move the building to the north, whereas a negative change will move the building to the south.
Vertical alignment (3D)
Toggle on to use the vertical alignment controls; toggle off to save the alignment to the database.
Terrain Height (ft)
The Terrain Height (ft) setting specifies how much of the building's structure is below ground level. This setting is measured in Feet (ft).
The effect of higher values in this setting, will mean that a larger portion of the building is placed below the terrain. Lower values mean that most of the building is above ground.
Search box
The Search box allows you to enter an address or location and the map will quickly jump directly to that specific area.
The Search box will be active, once you activate the Realignment Mode. When you enter an address, the map view will be updated, assisting in locating and relaligning the building relative to its actual geographic position.
Reset
The Reset option reverts the building to its previous geospatial setings, before entering realignment mode. A reset will discard any changes made to the bearing, longtitude, latitude, and terrain height settings and restore the building settings to the last saved alignment state.