Lesson 5 - Managing State with Redux
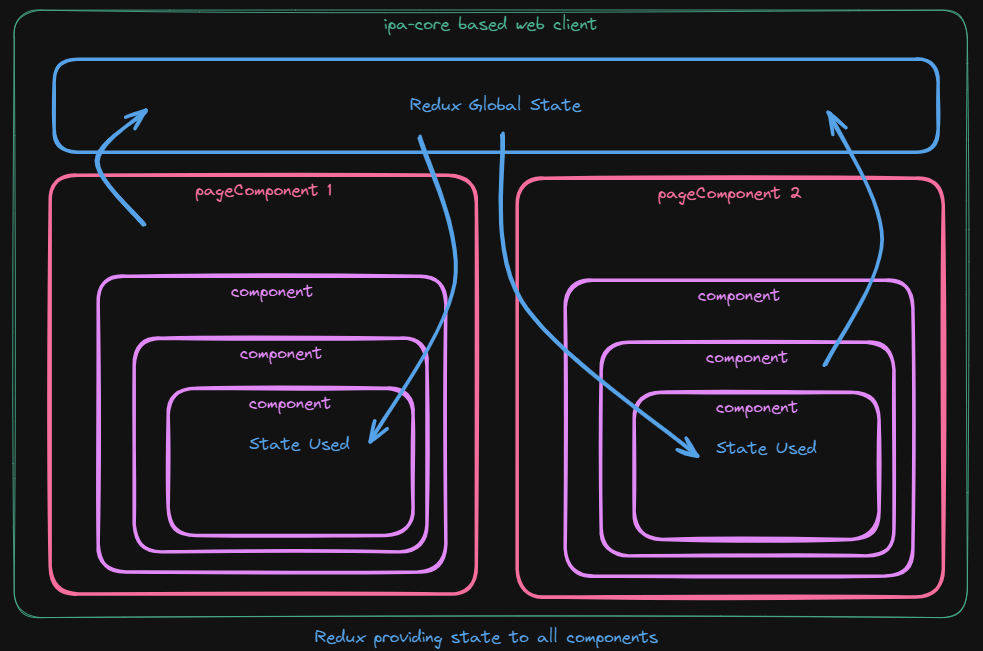
The React ipa-core framework provides an extensible implementation of Redux to allow you to use existing and create new global application state. Using Redux, you can create state at the global application level and use it across React components and pageComponents.
Adding your own Redux slices is as easy as creating your slice, dropping it in your app/ipaCore/redux folder and updating your ipaConfig.js file. From there, ipa-core will load your slice into the global Redux store it manages.
In the following steps we will see how to take a simple React page managing state locally and passing it via props to its subcomponents and transform it into using Redux.
Add a Test pageComponent#
The first step will be to create a new pageComponent and component that we can use to implement Redux state. At first we will just create the page and add it to our user config so it appears in our React application. In the next step, we will create a slice and have ipa-core load it into the Redux store.
- Download the attached reduxUserSettingsEdit.zip file and extract it locally
- Copy the
reduxUserSettingsEditfolder into yourapp/ipaCore/pageComponentsfolder - In the Twinit IDE Extension open your user config
- In your handlers add the following configuration to configure the
reduxUserSettingsEdit
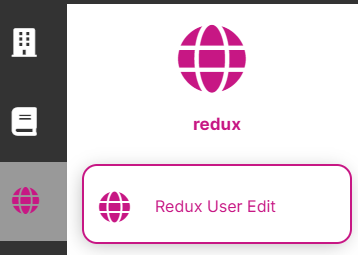
"handlers": { "reduxEdit": { "title": "Redux User Edit", "icon": "fas fa-globe fa-2x", "shortName": "reduxedit", "description": "Redux User Edit", "pageComponent": "reduxUserSettingsEdit/reduxUserSettingsEdit", "path": "/reduxedit", "config": {} }}- In your grouped pages add the following configuration to add the
reduxUserSettingsEditto your client's navigation bar
"groupedPages": { "redux": { "icon": "fas fa-globe fa-2x", "position": 3, "pages": [ { "page": "Redux Edit", "handler": "reduxEdit" } ] }}- Commit your changes to a new version of the user config
- In your client switch projects and select your project again, or log out and log in again to refresh your user config
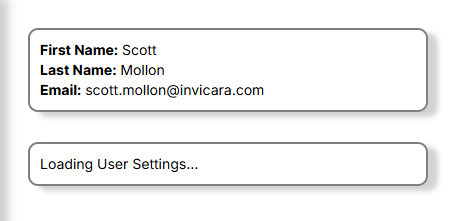
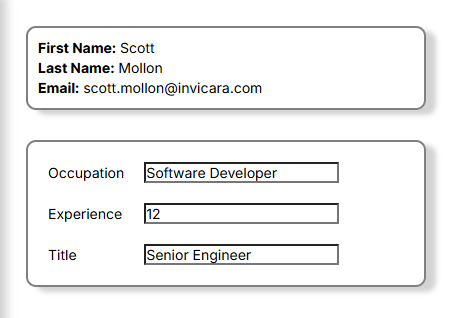
Your client should now have the Redux User Edit Page in the nav bar:
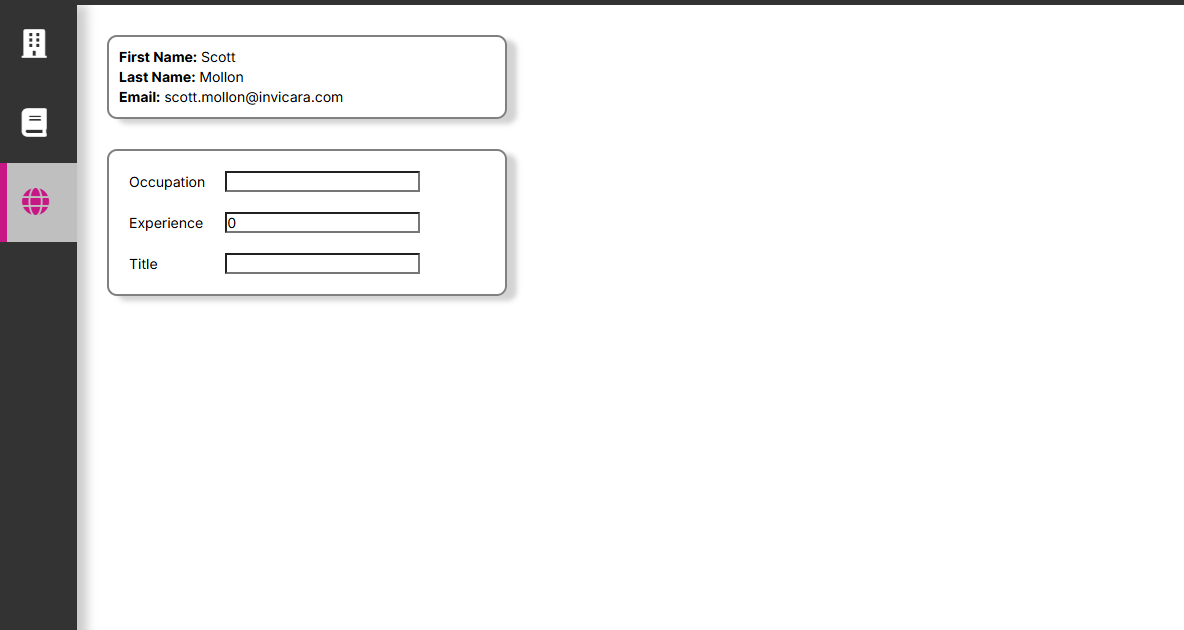
And the new page should look like this:
If your page doesn't load double check your user config to make sure you don't have any typos in the pageComponent property.
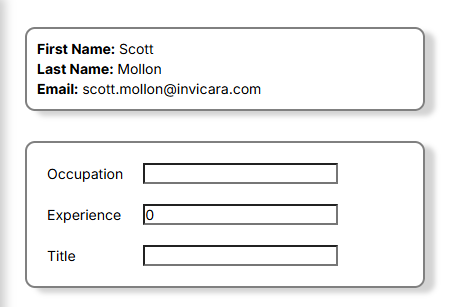
Try entering an Occupation and Title, and also a number for experience. All fields should update as you change them.
Understanding the pageComponent#
Let's take a minute to understand what the page is doing before we update it to use Redux in the following steps.
reduxUserSettingsEdit.jsx
Open app/ipaCore/pageComponents/reduxUserSettingsEdit.jsx. This is the pageComponent that will display in your web client. It manages two states locally: user, and userSettings. Both of these states are passed via props to their respective Card component (UserCard and UserSettingsCard) that displays the state.
In the case of the UserSettingsCard, it also takes a callback to receive settings updates the user makes in the UserSettingsCard.
State Management
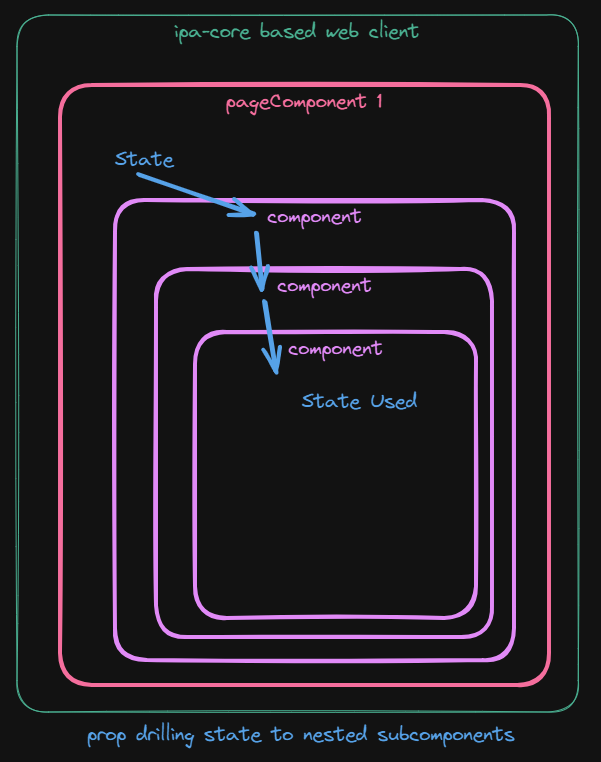
The page currently manages all state at the pageComponent level using useState(). This means that all state that is needed in subcomponents must be provided via props to the subcomponents. If the state is needed multiple levels of subcomponents deep then we need to pass the state down through all the layers of subcomponents, through subcomponents that may not even need the state. This is called 'prop drilling' and we try to avoid it due to side effects like unnecessary re-renders, components tightly coupled to unnecessary state, and general maintainability.
React Contexts
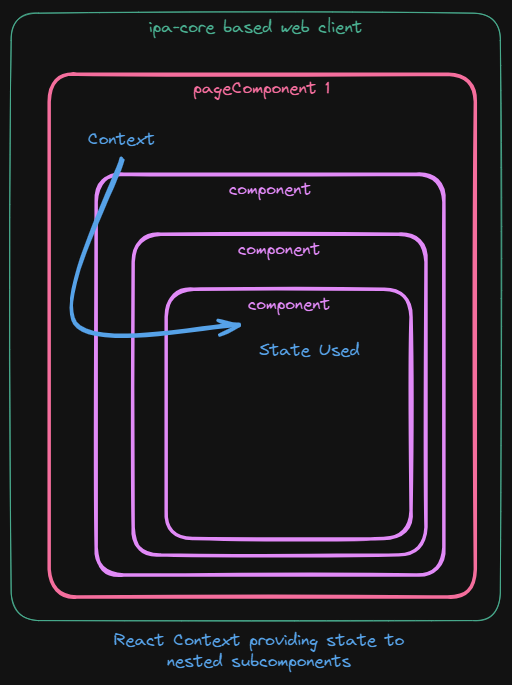
We could move both states on the page into React Contexts. And this would work for a deeply nested pageComponent with many subcomponent levels. If the state is only needed on a given page then this could be a good solution. The Contexts could make the state available to all the subcomponents that need it in an efficient manner.
However, what if we wanted our user state to be available across pages in the application? Since ipa-core doesn't have a mechanism for loading React Contexts globally, we will instead use ipa-core's support for ...
Redux
Using Redux we will make changes to app/ipaCore/pageComponents/reduxUserSettingsEdit.jsx to use a Redux Slice that ipa-core will add to the global Redux store. Doing so will make the user and user settings state available globally to the app and able to be used by any components and pages that need it.
We will also make changes to both app/ipaCore/pageComponents/reduxUserSettingsEdit/components/UserCard.jsx and app/ipaCore/pageComponents/reduxUserSettingsEdit/components/UserSettingsCard.jsx to use the Redux state instead of props passed down to them.
Add a User Settings Slice#
We will start by moving the User Settings state into Redux. The first thing we will do is...
Create a User Settings Slice#
- Create a new file in
app/ipaCore/reduxnameduserSettingsSlice.js - Open the file
- Replace the contents with the basic Slice code below and save the file
import { createSlice } from '@reduxjs/toolkit'
// Redux User Settings Sliceexport const userSettingsSlice = createSlice({  name: 'userSettings',  initialState: {
  },  reducers: {
  }})
export const {  } = userSettingsSlice.actions
export default userSettingsSlice.reducerNext we will move the state from app/ipaCore/pageComponents/reduxUserSettingsEdit.jsx into the new Slice.
- In the Slice, add the three user settings to the initialState of the Slice as below. This will initialize our userSettings with default values when the slice is created.
import { createSlice } from '@reduxjs/toolkit'
// Redux User Settings Sliceexport const userSettingsSlice = createSlice({  name: 'userSettings',  initialState: {    occupation: '',    experience: 0,    title: ''  },  reducers: {
  }})
export const {  } = userSettingsSlice.actions
export default userSettingsSlice.reducer- Now add a reducer to allow us to set the userSettings when they change
import { createSlice } from '@reduxjs/toolkit'
// Redux User Settings Sliceexport const userSettingsSlice = createSlice({  name: 'userSettings',  initialState: {    occupation: '',    experience: 0,    title: ''  },  reducers: {    setUserSettings: (state, action) => {      state.occupation = action.payload.occupation      state.experience = action.payload.experience      state.title = action.payload.title    }  }})
export const {  } = userSettingsSlice.actions
export default userSettingsSlice.reducer- Finally add the reducer to exported actions so our components can use it
import { createSlice } from '@reduxjs/toolkit'
// Redux User Settings Sliceexport const userSettingsSlice = createSlice({  name: 'userSettings',  initialState: {    occupation: '',    experience: 0,    title: ''  },  reducers: {    setUserSettings: (state, action) => {      state.occupation = action.payload.occupation      state.experience = action.payload.experience      state.title = action.payload.title    }  }})
export const { setUserSettings } = userSettingsSlice.actions
export default userSettingsSlice.reducer- Save the file
Load the Redux Slice#
We have our Slice ready, now we need to update our configuration to tell ipa-core to load it as part of our application and add it to the global Redux store.
- Open
app/ipaCore/ipaCore.js - Add an entry to the redux
slicesarray to load your new slice
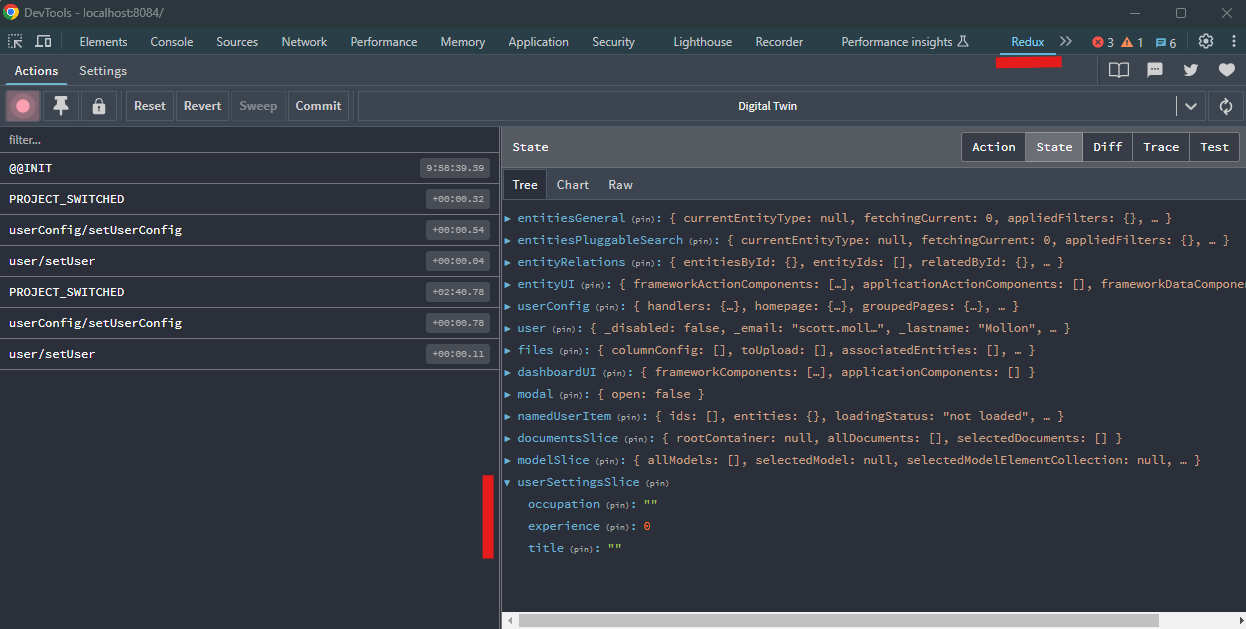
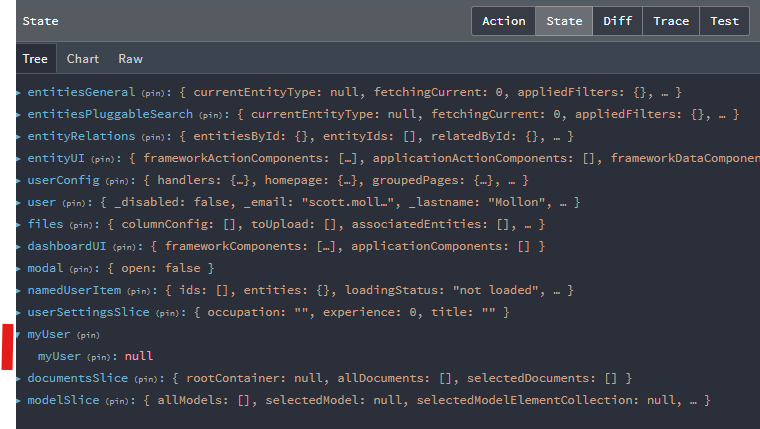
redux: { slices: [ { name: 'userSettingsSlice', file: 'userSettingsSlice.js' } ]},If you have the Redux DevTools installed for your browser chrome link to Redux DevTools, if your client is running, you can refresh your browser or if not, you can run your client with npm run watch, and you should be able to see your new slice.
Use the User Settings Slice#
With our new UserSettingsSlice loaded and ready to use, we will now need to update our pageComponent and UserSettingsCard component to use the Redux state instead of the local state.
Remove Local State#
- Open
reduxUserSettingsEdit.jsx - Delete the code defining the userSettings state with useState()
import React, { useState, useEffect } from 'react'
import { IafPassSvc } from '@dtplatform/platform-api'
import UserCard from './components/UserCard'import UserSettingsCard from './components/UserSettingsCard'
const reduxUserSettingsEdit = () => {
  const [ user, setUser ] = useState()  const [ userSettings, setUserSettings ] = useState({    occupation: '',    experience: 0,    title: ''  })
  useEffect(() => {    getUser()  }, [])
  const getUser = async () => {    let me = await IafPassSvc.getCurrentUser()    setUser(me)  }
  const updateSettings = (newSettings) => {    setUserSettings(newSettings)  }
  return <div className='edit-page-body'>    <UserCard user={user}/>    <UserSettingsCard settings={userSettings} onChange={updateSettings}/>  </div>
}
export default reduxUserSettingsEdit- Delete the updateSettings function
import React, { useState, useEffect } from 'react'
import { IafPassSvc } from '@dtplatform/platform-api'
import UserCard from './components/UserCard'import UserSettingsCard from './components/UserSettingsCard'
const reduxUserSettingsEdit = () => {
  const [ user, setUser ] = useState()
  useEffect(() => {    getUser()  }, [])
  const getUser = async () => {    let me = await IafPassSvc.getCurrentUser()    setUser(me)  }
  return <div className='edit-page-body'>    <UserCard user={user}/>    <UserSettingsCard settings={userSettings} onChange={updateSettings}/>  </div>
}
export default reduxUserSettingsEdit- Remove the settings and onChange props from the
<UserSettingsCard />component
import React, { useState, useEffect } from 'react'
import { IafPassSvc } from '@dtplatform/platform-api'
import UserCard from './components/UserCard'import UserSettingsCard from './components/UserSettingsCard'
const reduxUserSettingsEdit = () => {
  const [ user, setUser ] = useState()
  useEffect(() => {    getUser()  }, [])
  const getUser = async () => {    let me = await IafPassSvc.getCurrentUser()    setUser(me)  }
  return <div className='edit-page-body'>    <UserCard user={user}/>    <UserSettingsCard settings={userSettings} onChange={updateSettings}/>  </div>
}
export default reduxUserSettingsEdit- Save the file
import React, { useState, useEffect } from 'react'
import { IafPassSvc } from '@dtplatform/platform-api'
import UserCard from './components/UserCard'import UserSettingsCard from './components/UserSettingsCard'
const reduxUserSettingsEdit = () => {
const [ user, setUser ] = useState()
useEffect(() => { getUser() }, [])
const getUser = async () => { let me = await IafPassSvc.getCurrentUser() setUser(me) }
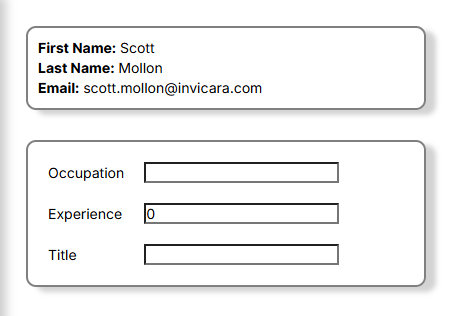
return <div className='edit-page-body'> <UserCard user={user}/> <UserSettingsCard /> </div>
}
export default reduxUserSettingsEditIf your client is running in the browser, you will see the UserSettingsCard display this message since we have removed the state it relies on.
Use Redux in UserSettingsCard.jsx#
- Open
components/UserSettingsCard.jsx - Delete the props from the component signature
import React, { useState, useEffect } from 'react'
import './Card.scss'
const UserSettingsCard = ({ settings, onChange }) => {
  const handleChange = (setting, value) => {
    let updatedSettings = structuredClone(settings)    updatedSettings[setting] = value    onChange(updatedSettings)
  }
  return <div className='info-card user-card'>    {!settings && <div className='loading-user'>Loading User Settings...</div>}    {settings && <div className='settings-info'>      <table className='settings-info-table'>        <tbody>          <tr>            <td>Occupation</td>            <td><input type='text' onChange={(e) => handleChange('occupation', e.target.value)} value={settings.occupation}></input></td>          </tr>          <tr>            <td>Experience</td>            <td><input type='number' onChange={(e) => handleChange('experience', e.target.value)} value={settings.experience}></input></td>          </tr>          <tr>            <td>Title</td>            <td><input type='text' onChange={(e) => handleChange('title', e.target.value)} value={settings.title}></input></td>          </tr>        </tbody>      </table>    </div>}  </div>
}
export default UserSettingsCard- Import the
useSelectorhook from react-redux. This will allow us to access the global Redux state
import React, { useState, useEffect } from 'react'
import { useSelector } from 'react-redux'
import './Card.scss'
const UserSettingsCard = () => {
  const handleChange = (setting, value) => {
    let updatedSettings = structuredClone(settings)    updatedSettings[setting] = value    onChange(updatedSettings)
  }
  return <div className='info-card user-card'>    {!settings && <div className='loading-user'>Loading User Settings...</div>}    {settings && <div className='settings-info'>      <table className='settings-info-table'>        <tbody>          <tr>            <td>Occupation</td>            <td><input type='text' onChange={(e) => handleChange('occupation', e.target.value)} value={settings.occupation}></input></td>          </tr>          <tr>            <td>Experience</td>            <td><input type='number' onChange={(e) => handleChange('experience', e.target.value)} value={settings.experience}></input></td>          </tr>          <tr>            <td>Title</td>            <td><input type='text' onChange={(e) => handleChange('title', e.target.value)} value={settings.title}></input></td>          </tr>        </tbody>      </table>    </div>}
  </div>
}
export default UserSettingsCard- Use the
useSelectorhook to get the settings from the Redux Slice
import React, { useState, useEffect } from 'react'
import { useSelector } from 'react-redux'
import './Card.scss'
const UserSettingsCard = () => {
  let settings = useSelector((state) => state.userSettingsSlice)
  const handleChange = (setting, value) => {
    let updatedSettings = structuredClone(settings)    updatedSettings[setting] = value    onChange(updatedSettings)
  }
  return <div className='info-card user-card'>    {!settings && <div className='loading-user'>Loading User Settings...</div>}    {settings && <div className='settings-info'>      <table className='settings-info-table'>        <tbody>          <tr>            <td>Occupation</td>            <td><input type='text' onChange={(e) => handleChange('occupation', e.target.value)} value={settings.occupation}></input></td>          </tr>          <tr>            <td>Experience</td>            <td><input type='number' onChange={(e) => handleChange('experience', e.target.value)} value={settings.experience}></input></td>          </tr>          <tr>            <td>Title</td>            <td><input type='text' onChange={(e) => handleChange('title', e.target.value)} value={settings.title}></input></td>          </tr>        </tbody>      </table>    </div>}
  </div>
}
export default UserSettingsCard- Save the file
If you are running your client in the browser, the page should refresh and the settings should display their defaults.
Trying to change the settings, however will result in an error. So let's now allow the page to...
Update Redux State#
- If you closed it, reopen
components/UserSettingsCard.jsx - Import the
useDispatchhook along withuseSelectorso we can dispatch actions to Redux
import React, { useState, useEffect } from 'react'
import { useSelector, useDispatch } from 'react-redux'
import './Card.scss'
const UserSettingsCard = () => {
  let settings = useSelector((state) => state.userSettingsSlice)
  const handleChange = (setting, value) => {
    let updatedSettings = structuredClone(settings)    updatedSettings[setting] = value    onChange(updatedSettings)
  }
  return <div className='info-card user-card'>    {!settings && <div className='loading-user'>Loading User Settings...</div>}    {settings && <div className='settings-info'>      <table className='settings-info-table'>        <tbody>          <tr>            <td>Occupation</td>            <td><input type='text' onChange={(e) => handleChange('occupation', e.target.value)} value={settings.occupation}></input></td>          </tr>          <tr>            <td>Experience</td>            <td><input type='number' onChange={(e) => handleChange('experience', e.target.value)} value={settings.experience}></input></td>          </tr>          <tr>            <td>Title</td>            <td><input type='text' onChange={(e) => handleChange('title', e.target.value)} value={settings.title}></input></td>          </tr>        </tbody>      </table>    </div>}
  </div>
}
export default UserSettingsCard- Import the
setUserSettingsaction from the UserSettingsSlice
import React, { useState, useEffect } from 'react'
import { useSelector, useDispatch } from 'react-redux'import { setUserSettings } from '../../../redux/userSettingsSlice'
import './Card.scss'
const UserSettingsCard = () => {
  let settings = useSelector((state) => state.userSettingsSlice)
  const handleChange = (setting, value) => {
    let updatedSettings = structuredClone(settings)    updatedSettings[setting] = value    onChange(updatedSettings)
  }
  return <div className='info-card user-card'>    {!settings && <div className='loading-user'>Loading User Settings...</div>}    {settings && <div className='settings-info'>      <table className='settings-info-table'>        <tbody>          <tr>            <td>Occupation</td>            <td><input type='text' onChange={(e) => handleChange('occupation', e.target.value)} value={settings.occupation}></input></td>          </tr>          <tr>            <td>Experience</td>            <td><input type='number' onChange={(e) => handleChange('experience', e.target.value)} value={settings.experience}></input></td>          </tr>          <tr>            <td>Title</td>            <td><input type='text' onChange={(e) => handleChange('title', e.target.value)} value={settings.title}></input></td>          </tr>        </tbody>      </table>    </div>}
  </div>
}
export default UserSettingsCard- Create the dispatch function
import React, { useState, useEffect } from 'react'
import { useSelector, useDispatch } from 'react-redux'import { setUserSettings } from '../../../redux/userSettingsSlice'
import './Card.scss'
const UserSettingsCard = () => {
  let settings = useSelector((state) => state.userSettingsSlice)  const dispatch = useDispatch()
  const handleChange = (setting, value) => {
    let updatedSettings = structuredClone(settings)    updatedSettings[setting] = value    onChange(updatedSettings)
  }
  return <div className='info-card user-card'>    {!settings && <div className='loading-user'>Loading User Settings...</div>}    {settings && <div className='settings-info'>      <table className='settings-info-table'>        <tbody>          <tr>            <td>Occupation</td>            <td><input type='text' onChange={(e) => handleChange('occupation', e.target.value)} value={settings.occupation}></input></td>          </tr>          <tr>            <td>Experience</td>            <td><input type='number' onChange={(e) => handleChange('experience', e.target.value)} value={settings.experience}></input></td>          </tr>          <tr>            <td>Title</td>            <td><input type='text' onChange={(e) => handleChange('title', e.target.value)} value={settings.title}></input></td>          </tr>        </tbody>      </table>    </div>}
  </div>
}
export default UserSettingsCard- Replace the
onChangein thehandleChangefunction to instead dispatch the setUserSettings action with the updatedSettings
import React, { useState, useEffect } from 'react'
import { useSelector, useDispatch } from 'react-redux'import { setUserSettings } from '../../../redux/userSettingsSlice'
import './Card.scss'
const UserSettingsCard = () => {
  let settings = useSelector((state) => state.userSettingsSlice)  const dispatch = useDispatch()
  const handleChange = (setting, value) => {
    let updatedSettings = structuredClone(settings)    updatedSettings[setting] = value    dispatch(setUserSettings(updatedSettings))
  }
  return <div className='info-card user-card'>    {!settings && <div className='loading-user'>Loading User Settings...</div>}    {settings && <div className='settings-info'>      <table className='settings-info-table'>        <tbody>          <tr>            <td>Occupation</td>            <td><input type='text' onChange={(e) => handleChange('occupation', e.target.value)} value={settings.occupation}></input></td>          </tr>          <tr>            <td>Experience</td>            <td><input type='number' onChange={(e) => handleChange('experience', e.target.value)} value={settings.experience}></input></td>          </tr>          <tr>            <td>Title</td>            <td><input type='text' onChange={(e) => handleChange('title', e.target.value)} value={settings.title}></input></td>          </tr>        </tbody>      </table>    </div>}
  </div>
}
export default UserSettingsCard- Save the file
You should now be able to edit the user settings without any errors.
And your changes should be visible in the slice in the Redux DevTools.

Now that we've moved the User Settings state to Redux, the UserSettingsCard can easily be used on any number of pages without the need for the parent pages to worry about loading the user settings. The card, no matter where it appears, will always go to the global Redux state for its data.
Add a myUser Slice and a Thunk#
Next let's move the user state to Redux, but let's also implement a Thunk to retrieve the user from Twinit.
Create a myUser Slice#
- Create a new file in
app/ipaCore/reduxnamedmyUserSlice.js - Open the file
- Replace the contents with the basic Slice code below and save the file
- Add a
myUserproperty set to null to theinitialStateof the Slice
import { createSlice } from '@reduxjs/toolkit'
// Redux User Settings Sliceexport const myUserSlice = createSlice({  name: 'myUser',  initialState: {    myUser: null  },  reducers: {
  }})
export const {  } = myUserSlice.actions
export default myUserSlice.reducerIn this example we won't create a reducer to set the user. Instead we will...
Use a Thunk to Fetch the User from Twinit#
- Add
createAsyncThunkto the import from@reduxjs/toolkit
import { createSlice, createAsyncThunk } from '@reduxjs/toolkit'
// Redux User Settings Sliceexport const myUserSlice = createSlice({  name: 'myUser',  initialState: {    myUser: null  },  reducers: {
  }})
export const {  } = myUserSlice.actions
export default myUserSlice.reducer- Add a new empty Thunk named
getCurrentUserusingcreateAsyncThunk
import { createSlice, createAsyncThunk } from '@reduxjs/toolkit'
// Redux User Settings Sliceexport const myUserSlice = createSlice({  name: 'myUser',  initialState: {    myUser: null  },  reducers: {
  }})
export const getCurrentUser = createAsyncThunk('user/getCurrent',  async() => {    ...  })
export const {  } = myUserSlice.actions
export default myUserSlice.reducer- In the Thunk, add code to return the user from Twinit - don't forget to import IafPassSvc
import { createSlice, createAsyncThunk } from '@reduxjs/toolkit'
import { IafPassSvc } from '@dtplatform/platform-api'
// Redux User Settings Sliceexport const myUserSlice = createSlice({  name: 'myUser',  initialState: {    myUser: null  },  reducers: {
  }})
export const getCurrentUser = createAsyncThunk('user/getCurrent',  async() => {    return await IafPassSvc.getCurrentUser()  })
export const {  } = myUserSlice.actions
export default myUserSlice.reducer- To update the state based on the result of the Thunk, we will build
extraReducersto handle the pending, fulfilled, and rejected states of the Thunk's returned Promise. Add theextraReducersbelow to your Slice.
import { createSlice, createAsyncThunk } from '@reduxjs/toolkit'
import { IafPassSvc } from '@dtplatform/platform-api'
// Redux User Settings Sliceexport const myUserSlice = createSlice({  name: 'myUser',  initialState: {    myUser: null  },  reducers: {
  },  extraReducers: (builder) => {    builder      .addCase(getCurrentUser.pending, (state, action) => {
      })      .addCase(getCurrentUser.fulfilled, (state, action) => {
      })      .addCase(getCurrentUser.rejected, (state, action) => {
      })  }})
export const getCurrentUser = createAsyncThunk('user/getCurrent',  async() => {    return await IafPassSvc.getCurrentUser()  })
export const {  } = myUserSlice.actions
export default myUserSlice.reducer- For the pending and rejected states just log to the browser console
- For the fulfilled state, set myUser in the state to the result of the Thunk which is passed as the action payload
import { createSlice, createAsyncThunk } from '@reduxjs/toolkit'
import { IafPassSvc } from '@dtplatform/platform-api'
// Redux User Settings Sliceexport const myUserSlice = createSlice({  name: 'myUser',  initialState: {    myUser: null  },  reducers: {
  },  extraReducers: (builder) => {    builder      .addCase(getCurrentUser.pending, (state, action) => {        console.log('<---Retrieving User from Twinit--->')      })      .addCase(getCurrentUser.fulfilled, (state, action) => {        state.myUser = action.payload      })      .addCase(getCurrentUser.rejected, (state, action) => {        console.error('<---ERROR: Retrieving User from Twinit!--->')      })  }})
export const getCurrentUser = createAsyncThunk('user/getCurrent',  async() => {    return await IafPassSvc.getCurrentUser()  })
export const {  } = myUserSlice.actions
export default myUserSlice.reducer- Save the file
Configure ipa-core to load the myUser Slice#
- Open
app/ipaCore/ipaCore.js - Add your new
myUserSliceto thereduxsettings and save the file
redux: { slices: [ { name: 'userSettingsSlice', file: 'userSettingsSlice.js' }, { name: 'myUser', file: 'myUserSlice.js'} ]},If using the Redux DevTools you should see your slice in the State
Use myUserSlice and Thunk#
Remove Local State#
First remove the local state from reduxUserSettingsEdit.jsx as we will replace it with our new Slice.
- Open
reduxUserSettingsEdit.jsx - Delete the import of
IafPassSvc - Delete the code defining the user state with
useState() - Delete the code for the
useEffect() - Delete the
getUserfunction - Delete the
userprop passed to the<UserCard />component - Save the file
import UserCard from './components/UserCard'import UserSettingsCard from './components/UserSettingsCard'
const reduxUserSettingsEdit = () => {
  return <div className='edit-page-body'>    <UserCard />    <UserSettingsCard />  </div>
}
export default reduxUserSettingsEditAt this point your page will show a UserCard saying it is loading User Info because we have removed the state it is currently relying on.

Use Redux in the UserCard Component#
- Open
components/UserCard.jsx - Delete the
userprop from the component signature - Import
useSelectoranduseDispatchfromreact-redux - Import your
getCurrentUserThunk from yourmyUserSlice
import React, { useState, useEffect } from 'react'
import { useSelector, useDispatch } from 'react-redux'import { getCurrentUser } from '../../../redux/myUserSlice'
import './Card.scss'
const UserCard = ( ) => {
  return <div className='info-card user-card'>    {!user && <div className='loading-user'>Loading User Info...</div>}    {user && <div className='user-info'>      <div className='firstname'><span className='info-label'>First Name:</span> {user._firstname}</div>      <div className='lastname'><span className='info-label'>Last Name:</span> {user._lastname}</div>      <div className='email'><span className='info-label'>Email:</span> {user._email}</div>    </div>}
  </div>
}
export default UserCard- Use the
useSelectorhook to get the current user - Use the
useDispatchhook to create dispatch
import React, { useState, useEffect } from 'react'
import { useSelector, useDispatch } from 'react-redux'import { getCurrentUser } from '../../../redux/myUserSlice'
import './Card.scss'
const UserCard = ( ) => {
  let user = useSelector((state) => state.myUser.myUser)  const dispatch = useDispatch()
  return <div className='info-card user-card'>    {!user && <div className='loading-user'>Loading User Info...</div>}    {user && <div className='user-info'>      <div className='firstname'><span className='info-label'>First Name:</span> {user._firstname}</div>      <div className='lastname'><span className='info-label'>Last Name:</span> {user._lastname}</div>      <div className='email'><span className='info-label'>Email:</span> {user._email}</div>    </div>}
  </div>
}
export default UserCard- Create a
useEffectthat runs when the component mounts, that dispatches yourgetCurrentUserThunk
import React, { useState, useEffect } from 'react'
import { useSelector, useDispatch } from 'react-redux'import { getCurrentUser } from '../../../redux/myUserSlice'
import './Card.scss'
const UserCard = ( ) => {
  let user = useSelector((state) => state.myUser.myUser)  const dispatch = useDispatch()
  useEffect(() => {    dispatch(getCurrentUser())  }, [])
  return <div className='info-card user-card'>    {!user && <div className='loading-user'>Loading User Info...</div>}    {user && <div className='user-info'>      <div className='firstname'><span className='info-label'>First Name:</span> {user._firstname}</div>      <div className='lastname'><span className='info-label'>Last Name:</span> {user._lastname}</div>      <div className='email'><span className='info-label'>Email:</span> {user._email}</div>    </div>}
  </div>
}
export default UserCard- Save the file
Once again your user info should appear on the page.
Improve the Slice#
If the user is already loaded and in the state, there's really no reason to load the user again. We can cut out those duplicate API calls by checking the state, and if the user is already loaded, skipping the API request.
Use the State's User#
createAsyncThunk will pass two parameters to the callback function you define. The first is the arguments object or any parameters passed to the Thunk on dispatch. The second is a reference to the ThunkApi from which we can get the current state.
So in our getCurrentUser Thunk we can check if myUser is already set, and if so, do nothing. We'll also look to make sure that the action has a payload before we assign the user in our fulfilled case.
import { createSlice, createAsyncThunk } from '@reduxjs/toolkit'
import { IafPassSvc } from '@dtplatform/platform-api'
// Redux User Settings Sliceexport const myUserSlice = createSlice({  name: 'myUser',  initialState: {    myUser: null  },  reducers: {
  },  extraReducers: (builder) => {    builder      .addCase(getCurrentUser.pending, (state, action) => {        console.log('<---Retrieving User from Twinit--->')      })      .addCase(getCurrentUser.fulfilled, (state, action) => {        if (action?.payload)          state.myUser = action.payload      })      .addCase(getCurrentUser.rejected, (state, action) => {        console.error('<---ERROR: Retrieving User from Twinit!--->')      })  }})
export const getCurrentUser = createAsyncThunk('user/getCurrent',  async(args, thunkApi) => {
    if (!thunkApi.getState().myUser.myUser)      return await IafPassSvc.getCurrentUser()    else return null  })
export const {  } = myUserSlice.actions
export default myUserSlice.reducerEnable Clearing the Current User#
We should also allow for clearing the user, for use if the user logs out for instance. We can do that by adding a simple reducer and exporting it from the actions.
import { createSlice, createAsyncThunk } from '@reduxjs/toolkit'
import { IafPassSvc } from '@dtplatform/platform-api'
// Redux User Settings Sliceexport const myUserSlice = createSlice({  name: 'myUser',  initialState: {    myUser: null  },  reducers: {    clearUser: (state, action) => {      state.myUser = null    }  },  extraReducers: (builder) => {    builder      .addCase(getCurrentUser.pending, (state, action) => {        console.log('<---Retrieving User from Twinit--->')      })      .addCase(getCurrentUser.fulfilled, (state, action) => {        if (action?.payload)          state.myUser = action.payload      })      .addCase(getCurrentUser.rejected, (state, action) => {        console.error('<---ERROR: Retrieving User from Twinit!--->')      })  }})
export const getCurrentUser = createAsyncThunk('user/getCurrent',  async(args, thunkApi) => {
    if (!thunkApi.getState().myUser.myUser)      return await IafPassSvc.getCurrentUser()    else return null  })
export const { clearUser } = myUserSlice.actions
export default myUserSlice.reducer