Lesson 2 - Add a Custom Page
Next we will add a new custom page to your application.
In order to add a custom page to your application there are two things you must do:
- Create the page component that will be displayed when you navigate to the page
- Update your user config to display the page
Download the Custom Page#
- Download the custom page code by clicking here
- Extract the zip file
- Copy
ItemsView.jsxintoapp/ipaCore/pageComponents
Read the pageComponent Code#
- Open the page in your IDE and examine the code.
It is a simple component that by default will display the page's handler from the user config. There are also a number of other template functions which we will complete in a later step to add the ability for the page to display your items from the Item Service.
Update Your User Config#
Add the Page Handler#
- In your IDE, open the 'Developer User Config' if you do not yet have it open
- Update the handlers section to match the below:
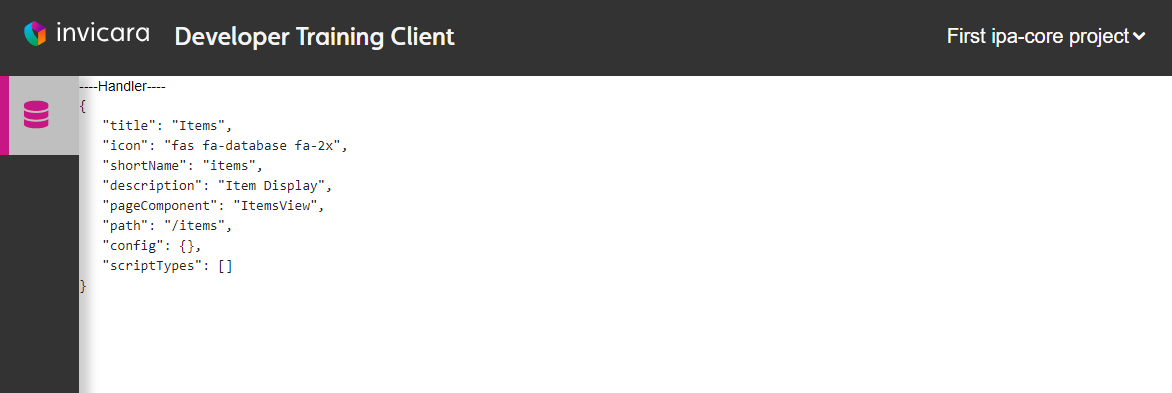
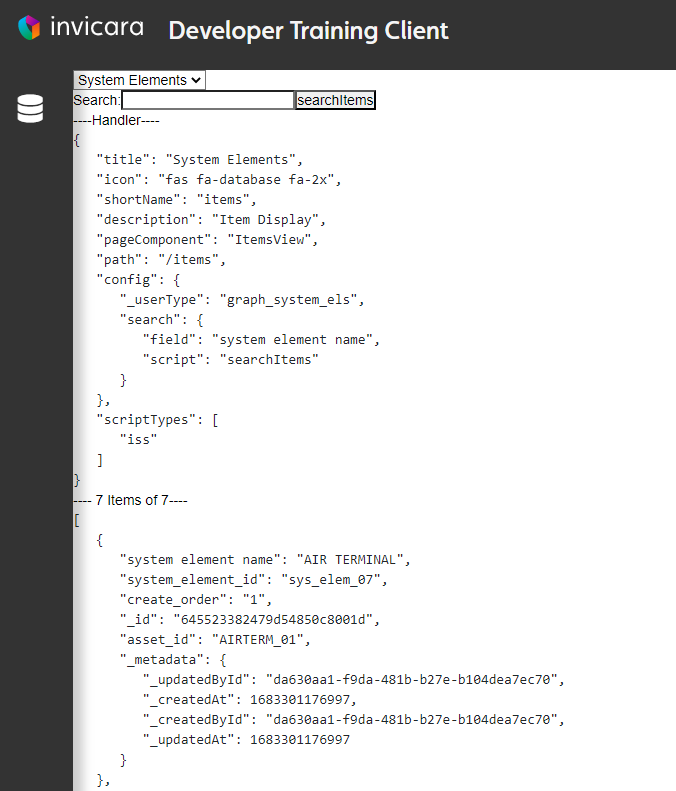
"handlers": { "items": { "title": "Items", "icon": "fas fa-database fa-2x", "shortName": "items", "description": "Item Display", "pageComponent": "ItemsView", "path": "/items", "config": {}, "scriptTypes": [] }},This is a basic page handler. It specifies to the ipa-core framework information about the page you want to load.
- title: The name of the page and what will be displayed in navigation user interfaces
- icon: An icon that will appear alongside the title in navigation user interfaces. You can use font awesome version 5 icons or icons that you build and make available as part of your app
- shortName: A short name for the page
- description: A description of the page
- pageComponent: The React component that should be loaded when the user navigates to the page. It is the page you downloaded and placed in app/ipaCore/pageComponents
- path: The path that will appear in the browser's url when the user navigates to the page
- config: Any configuration information you would like to provide to your page component
- scriptTypes: A list of _userTypes for scripts that should be loaded when the user navigates to the page
We will see how the config and scriptTypes enable you to specify user group specific options and business logic in later lessons.
Add the Page to the Navigation Pane#
- Update the user config's groupedPages to match the below:
"groupedPages": { "My Pages": { "icon": "fas fa-database fa-2x", "position": 1, "pages": [ { "page": "Items", "handler": "items" } ] }},This will create a My Pages group of pages in the Navigation pane of the application and add your Items page to it. Notice that the Items page references the handler you created above.
Add the Homepage#
Once we have pages in the application we must specify a page as the homepage.
- Update the homepage section to match the below:
"homepage": { "handler": "items"}Commit Your Updated User Config#
- Save your user config
- In the Twinit IDE Extension right click on the user config and click 'Commit to New Version'
- Enter a commit message and click Save
View Your Page in the Web Client#
If your client is still running in your browser, you can now easily reload your user config by selecting 'Switch Project' in the top right hand menu of the application and then selecting your project again.
If your client is not running, run npm run watch to bring it up.
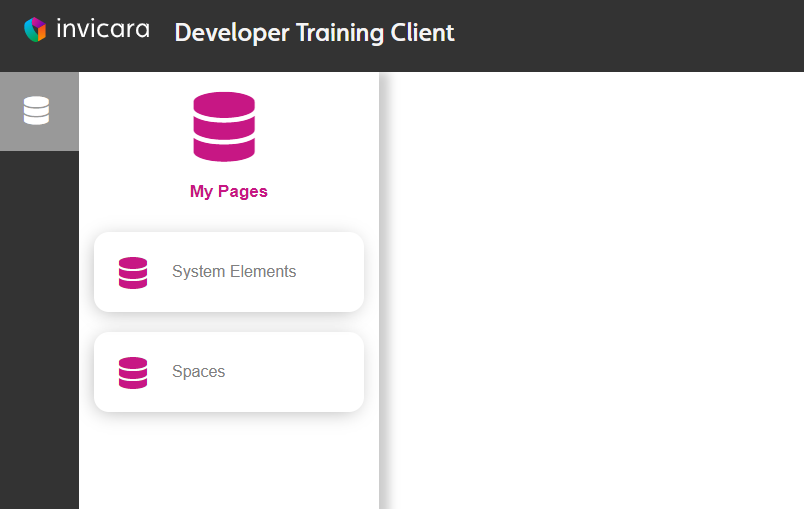
You should now see your Items page displayed in the My Pages group in the navigation pane and your page should be displaying the handler you have configured for your page.
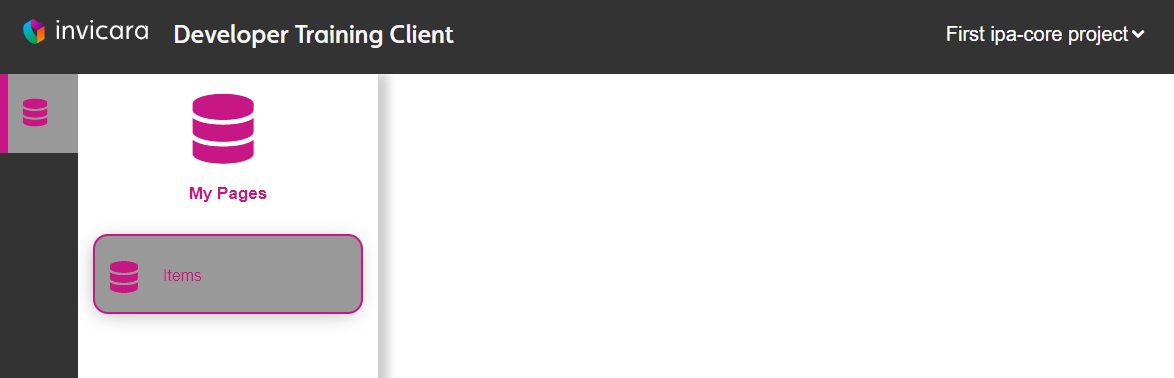 A new group called My Pages displays containing your new page
 The new page displays the handler you configured for the page
As you can see, the handler which you configure in the user config is made available in the props of the pageComponent. In this way you can use the configuration of the page to alter the page. It allows you to create generic pages that can be configured to show different information and it allows you to configure the page to behave differently based on the user group to which the user config is associated.
In the next step, we will enhance the page to display items in the Item Service.
Create Sample Item Service Data#
Next we will create some test data in your project for your application to use.
- Download the CreateTestData.zip by clicking here and extract it
- Add the 'Create Test Data.mjs' script to your project (right click script folder, select Create New Script, and copy paste the content of the downloaded script)
- Right click the script and click 'Run Script' and select 'Create Project Test Data'
- When prompted select the 'GraphTestData.xlsx' file
When the script completes your project will be populated with the sample data we will use with your custom page.
Display Sample Items on Your Page#
Open ItemsView.jsx in app/ipaCore/pageComponents.
You'll notice that a few template functions are provided. In this step you will complete those template functions to enable your page to show a select control listing the NamedUserCollections in your project and when a user selects one it will show the items in that NamedUserCollection.
Notice: When using ipa-core, it is not necessary to provide your ctx to the platform-api functions. The framework will manage this for you.
In the following steps you will be given the chance to write code to accomplish tasks on your own. Remember to use https://twinit.dev to look up anything you need. If you have issues, the completed code files are attached at the end of this lesson.
Get the NamedUserCollections in Your Project#
In the getCollections function uncomment the code that does these two things:
- Uses
IafItemSvc.getAllNamedUserItemsto fetch the NamedUserItems with _itemClass of 'NamedUserCollection' - Sets the collections state to the result of the
IafItemSvc.getAllNamedUserItemscall
When a Collection is Set Current, Fetch its Items#
In the getItems function uncomment the code that does these things:
- Use
IafItemSvc.getRelatedItemsto fetch the items in the collection with the_userItemIdincurrentCollection - Set the
itemsstate to the result of theIafItemSvc.getRelatedItemscall
Result#
When complete you should see a dropdown listing the Systems, System Elements, Spaces, Assets, and Alerts NamedUserCollections and the items in each should display on the page when you select them.
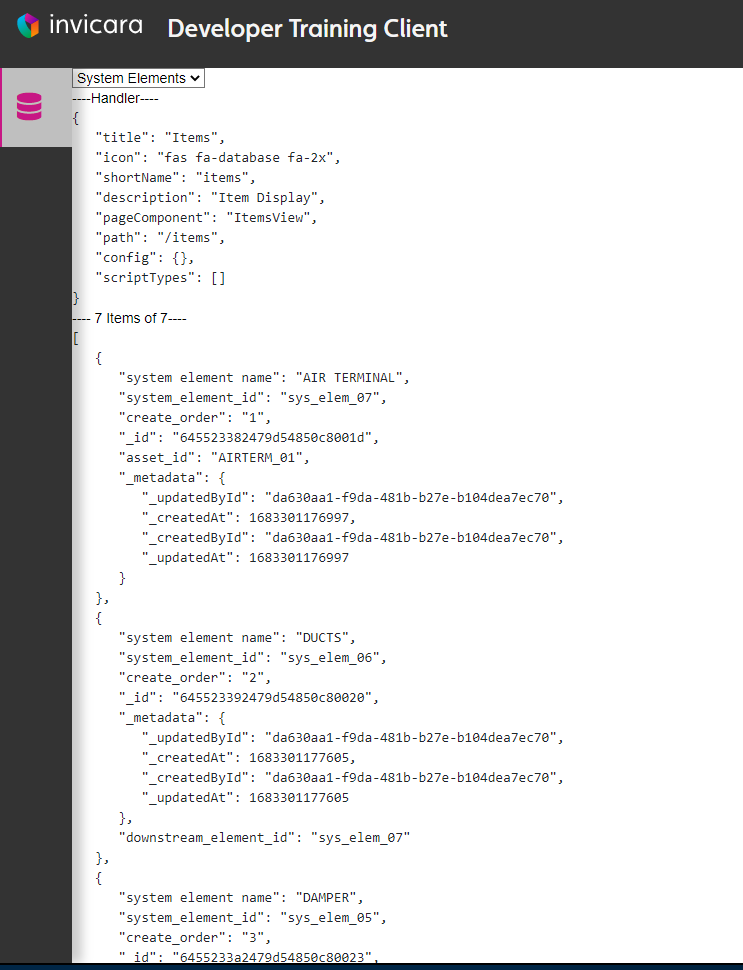 In addition to the handler, the page now displays a dropdown containing the various sample collections, and a list of items in the selected collection
Use the Handler to Configure Your Page#
Your page is currently hard coded to display the contents of any and all NamedUserCollections. But what if we wanted to allow for configuring which NamedUserCollections would be able to be displayed? In order to accomplish that we will utilize the config section of the handler in the user config.
To accomplish updating our page to be configurable we will do these things:
- Update our user config to provide the _userType to use when fetching NamedUserCollections
- Update our ItemsView pageComponent to use the
handler.configto retrieve the _userType
Update Your User Config#
- In the Twinit IDE Extension, open the 'Developer User Config' if you do not yet have it open
- Add a _userType config to the handler's config section as below:
"config": { "_userType": "graph_system_els"},- Save the user config and commit it to a new version (provide a commit message if desired)
Update the pageComponent#
- Update the
getCollectionsfunction in itemsView.jsx to useprops.handler.config._userTypein thegetRelatedItemsquery.
IafItemSvc.getAllNamedUserItems({query: { _itemClass: 'NamedUserCollection', _userType: props.handler.config._userType }}).then((colls) => { setCollections(colls)})- Save the file
Result#
Note: You will need to reload your user config in the web client by clicking Switch Project in the menu in the top right hand corner (or logging out and back in) and then selecting your project again. If you do not, the page will not function correctly.
Now when you view your page in the application you should see the _userType configuration in the handler and the page should only display System Elements in the dropdown.
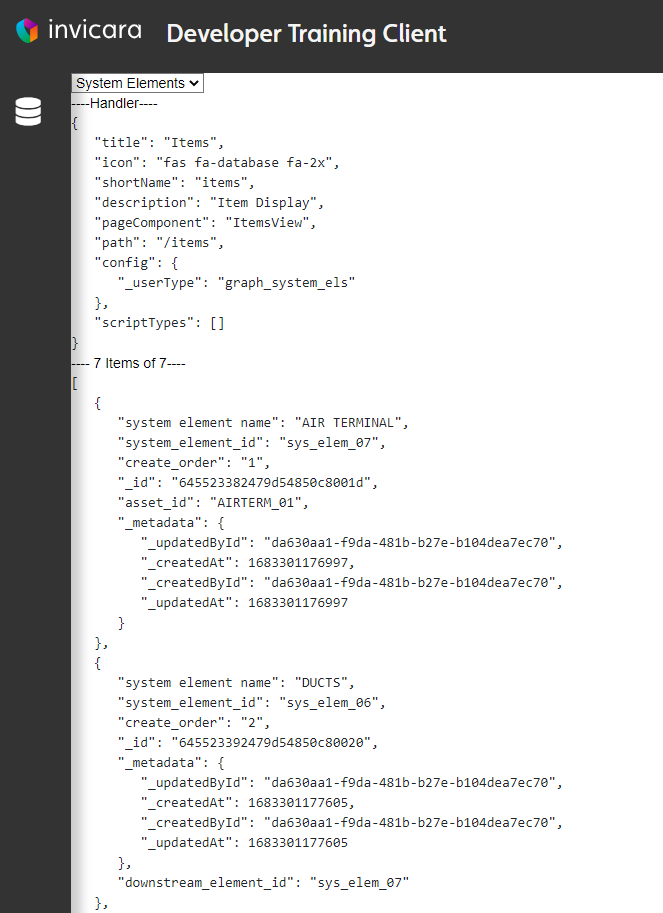 The handler now displays the _userType config from the User Config, and only allows the 'System Elements' collection to be selected
Add a Second Instance of ItemsView#
Now that we have the ItemsView pageComponent using the handler's config, we can configure multiple instances of the same pageComponent displaying different types of data.
Update Your User Config#
- Open the Developer User Config in the Twinit IDE Extension
- Add the following to the handlers section
"spaces": { "title": "Spaces", "icon": "fas fa-database fa-2x", "shortName": "dashboard", "description": "Space Display", "pageComponent": "ItemsView", "path": "/spaces", "config": { "_userType": "graph_spaces" }, "scriptTypes": []}- Add the following to the pages array on your My Pages group of pages
{ "page": "Spaces", "handler": "spaces"}- Since we are adding a second page, update the title for the original page to be "System Elements"
- Save the user config and commit it to a new version
Result#
Note: You will need to reload your user config in the web client by clicking Switch Project in the menu in the top right hand corner (or logging out and back in) and then selecting your project again. If you do not, the page will not function correctly.
Now, without writing any code we have repurposed the same page to display different data utilizing the handler's config.
 A second instance of the same page now displays in the navigation group
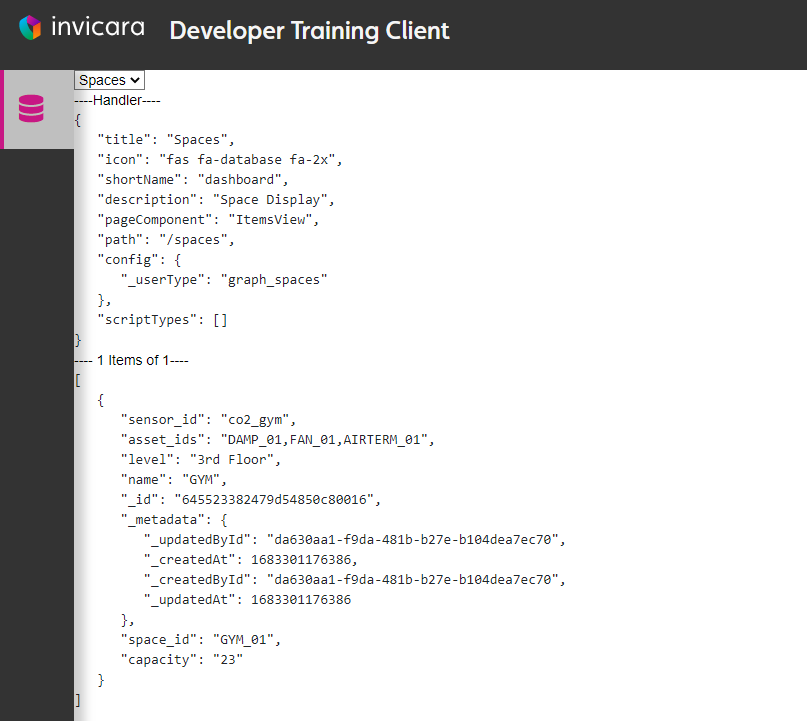 The second instance of the page displays Spaces instead of System Elements
Using scriptTypes#
Not only can you use the handler config to alter and customize the application for your users but you can also use scripts to customize the business logic of your page for your users. In this lesson we will move the getItems code into a script and configure the itemsView to use the script to fetch items.
In the next steps we will:
- Create a new script to contain our getItems business logic
- Update the user config to include configuration for a button which will execute our new script when clicked
- Update our ItemsView to run the configured script when the button is clicked
Download the new Item Search Scripts.mjs script.
Create a Script to Search Items#
Using the Twinit IDE Extension, create a new script in your project. You can give it any name, short name, and description, but be sure to give it the _userType iss.
Copy and paste the contents of the attached Item Search Scripts.mjs into the new script, save the file, and commit it to a new version.
Open and read through the Item Search Scripts.mjs. It is relatively simple. It takes three fields in the input parameter.
- input.userItemId: this is the _userItemId for the NamedUserCollection in which we want to search for items
- input.field: this is the field to search on items in the NamedUserCollection
- input.value: this is the value in the field we want to search for
Both input.field and input.value are optional. If neither is supplied all items will be returned.
Load Scripts Using scriptTypes#
Next we will configure both instances of the ItemsView pageComponent to load the script. Currently the scriptTypes array for both are empty. However, we can add the _userTypes of the scripts to the arrays to have our page load those scripts and make them available to be executed by our page.
In this case, we will have our page load the script with the _userType iss.
- Open the 'Developer User Config' in the Twinit IDE Extension
- In both the 'System Elements' and 'Spaces' handler, add "iss" to the scriptTypes array as below:
"scriptTypes": [ "iss"]Add Search Configuration#
- Next add an additional configuration to the System Elements handler to enable search on the page, by adding the search configuration below:
"config": { "_userType": "graph_system_els", "search": { "field": "system element name", "script": "searchItems" }},- Then add the same configuration to the Spaces handler but instead provide 'name' in the field to search:
"config": { "_userType": "graph_spaces", "search": { "field": "name", "script": "searchItems" }},- Save and commit the user config to a new version
These configurations serve a number of purposes.
- If the page finds config.search it will display a text search field and button
- If the user types in a search term and clicks the button, the page will execute the
searchItemsscript
Update Items View to Execute the Script#
Next we will update ItemsView to run the script. To do this we will use the ScriptHelper library.
ScriptHelper is a utility provided by ipa-core to make it easy to execute scripts on your page. The ScriptHelper.executeScript function accepts these parameters in this order:
- scriptName: The name of the script to run. It must be a script either specified in a handler's scriptTypes or loaded explicitly with
ScriptHelper.loadScript - operand: Any input to the script, usually a javascript object
- scriptResVar: Deprecated option, no longer in use and will be removed in the future, pass null for now
- ctx: Your context
- callback: a function to receive asynchronous results from the script as it executes
To update ItemsView:
- At the top of the file uncomment the import of the ScriptHelper library
- In the
getItemsfunction, comment the existing code executingIafItemSvc.getRelatedItems - In the
getItemsfunction, uncomment the code using ScriptHelper to execute the script - Save the file
Read over these changes and understand how they work before continuing.
Result#
Note: You will need to reload your user config in the web client by clicking Switch Project in the menu in the top right hand corner (or logging out and back in) and then selecting your project again. If you do not, the page will not function correctly.
After reloading your user config, you should now see a new search box.
 A search box now displays underneath the collection dropdown
- On the System elements page select the System Elements option, type in 'DUCTS' to the search box and click searchItems.
You should see two System Elements with the name 'DUCTS'.
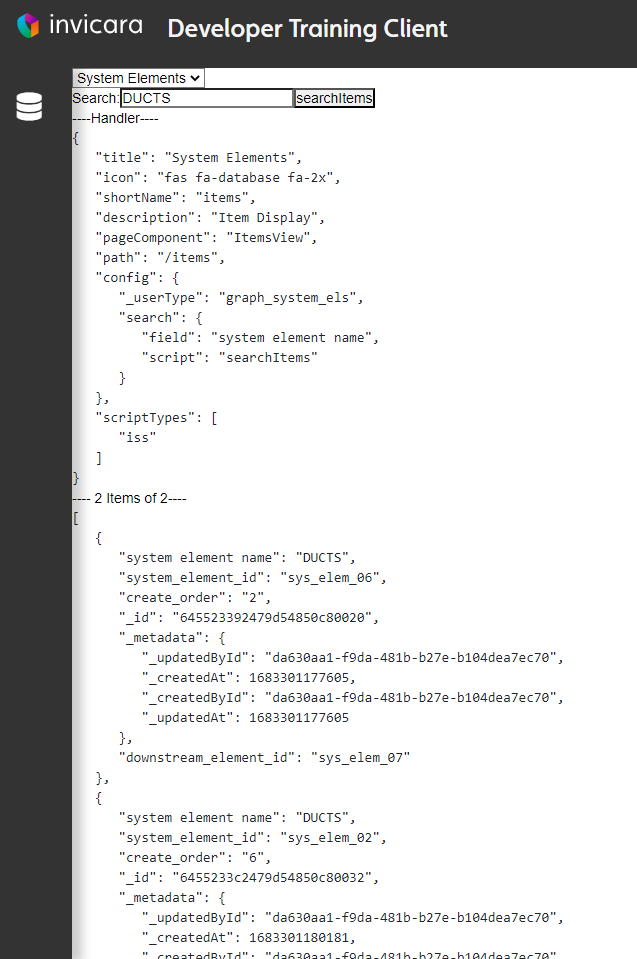 The list of DUCT items is displayed
Why Use a Script?#
You may be asking yourself why use a script?
By using a script to define the business logic, we can now change the business logic for different user configs associated with different users. This lesson was a simple case, but by using a script we could adjust the search to do different things for different groups of users. For instance, we could have a search that only returns the Room system elements for some users, but a search that returns all System Elements for others.
The user config allows us to connect a user with the UI and the business logic for their role.