First Workflows
You now have a provisioned project. This lesson is the first hands-on step: you will create all the example workflow definitions, then run one and inspect its result. This introduces the create → run → monitor cycle you will repeat for every task type in the rest of the course.
All the functions in this lesson live in the weather_workflow_demo_static script. Open it in the Twinit IDE Extension; its runnable functions appear in the script's run menu, grouped under headings (workflow creation, management, monitoring, and the underlying task scripts).
Step 1: Create the workflow definitions
Read the Code
Let's take a look at the basic code for creating a Workflow Definition.
Open the weather_workflow_demo_static script from Twinit. Search for "WORKFLOW 1: Basic Weather Fetch".
In this function you can see the basics of creating a workflow. First we define the Workflow Definition.
const workflowDef = {
  _name: "Basic_Weather_Fetch_Workflow",
  _description: "Fetch weather for multiple cities sequentially (replaces orchestrator pattern)",
  _namespaces: ctx._namespaces,
  _userType: "weather_workflow_basic_static",
  _timeoutPolicy: "TIME_OUT_WF",
  _timeoutSeconds: 300,
  _taskDefs: [
      {
          _type: "SCRIPT_EXECUTION",
          _name: "fetch_newyork_weather",
          _sequenceno: 1,
          _retryCount: 2,
          _timeoutSeconds: 30,
          _inputParams: {
              _userType: "weather_workflow_demo_static",
              _scriptName: "generateNewYorkWeatherData"
          }
      },
      {
          _type: "SCRIPT_EXECUTION",
          _name: "store_newyork_weather",
          _sequenceno: 2,
          _retryCount: 2,
          _timeoutSeconds: 60,
          _inputParams: {
              _userType: "weather_workflow_demo_static",
              _scriptName: "parseAndStoreWeatherFromWorkflow",
              "weatherData": "${fetch_newyork_weather._output.scriptOutput}"
          }
      },
      {
          _type: "SCRIPT_EXECUTION",
          _name: "fetch_sanfrancisco_weather",
          _sequenceno: 3,
          _retryCount: 2,
          _timeoutSeconds: 30,
          _inputParams: {
              _userType: "weather_workflow_demo_static",
              _scriptName: "generateSanFranciscoWeatherData"
          }
      },
      {
          _type: "SCRIPT_EXECUTION",
          _name: "store_sanfrancisco_weather",
          _sequenceno: 4,
          _retryCount: 2,
          _timeoutSeconds: 60,
          _inputParams: {
              _userType: "weather_workflow_demo_static",
              _scriptName: "parseAndStoreWeatherFromWorkflow",
              "weatherData": "${fetch_sanfrancisco_weather._output.scriptOutput}"
          }
      }
  ]
};
Three things to notice abotu Workflow Definitions:
- The
_name,_description, and_usertypepattern should be familiar now. - The Worfklow Def also includes two timeout configurations. The default
_timeoutPolicy: "TIME_OUT_WF"will terminate a workflow and mark it as TIMED_OUT after_timeoutSeconds: 300. - The
_taskDefsarray contains the ordered list of tasks that workflow will complete.
{
  _type: "SCRIPT_EXECUTION",
  _name: "store_newyork_weather",
  _sequenceno: 2,
  _retryCount: 2,
  _timeoutSeconds: 60,
  _inputParams: {
      _userType: "weather_workflow_demo_static",
      _scriptName: "parseAndStoreWeatherFromWorkflow",
      "weatherData": "${fetch_newyork_weather._output.scriptOutput}"
  }
}
Three things to notice about tasks, all of which recur throughout the course:
_sequencenoorders the tasks. Tasks run in ascending sequence.- A
SCRIPT_EXECUTIONtask names the script to run via_userType+_scriptName. Here_userType: "weather_workflow_demo_static"points at this very script;_scriptNameselects the function. - Data flows by binding.
store_newyork_weatherreads the output offetch_newyork_weatherthrough${fetch_newyork_weather._output.scriptOutput}. Thefetchstep returns a forecast object; thestorestep receives it asweatherDataand writes readings into the telemetry collection.
The fetch scripts (generateNewYorkWeatherData, generateSanFranciscoWeatherData) return static forecast JSON shaped exactly like a live weather API response, so the store script is identical to what it would be in a live production implementation.
Once the Workflow Definiition is defined it is created using the IafWorkflowSvc api.
const result = await IafWorkflowSvc.createWorkflowDef(workflowDef, ctx);
Run the Code
Run createAllWeatherWorkflows.
This single function creates all nine example WorkflowDefs in order. Internally it iterates over a list (ALL_WEATHER_WORKFLOWS) and calls each definition's creator function:
| _userType | Creator | What it demonstrates |
|---|---|---|
weather_workflow_basic_static | createBasicWeatherFetchWorkflow | Sequential steps |
weather_workflow_forkjoin_static | createParallelWeatherFetchWorkflow | FORK_JOIN parallelism |
weather_workflow_router_static | createWeatherRouterWorkflow | SWITCH routing |
weather_workflow_enricher_static | createWeatherEnricherWorkflow | Enricher pattern |
weather_workflow_splitter_static | createWeatherSplitterAggregatorWorkflow | Splitter–aggregator |
weather_workflow_polling_static | createWeatherPollingWorkflow | DO_WHILE polling |
weather_workflow_transformer_static | createWeatherTransformerWorkflow | Message translation |
weather_workflow_userinput_static | createWeatherUserInputWorkflow | USER_INPUT |
weather_workflow_ai_converse_static | createWeatherAIConverseWorkflow | AI_CONVERSE |
By default any previous definition with the same _userType is deleted first. This makes the function safe to re-run. You can call it again at any point in the course to reset all definitions to a known state.
The result summarises what happened:
{
    totalRequested: 9,
    totalCreated: 9,
    totalFailed: 0,
    results: [ { userType, label, success, workflowDefId, workflowName, workflowDef }, ... ]
}
Each entry includes the full server-returned workflowDef, so you can confirm your _taskDefs round-tripped through validation intact. If a definition fails validation, its entry has success: false and an error string. A fast way to catch a malformed task before you try to run it.
If you prefer to create definitions one at a time, run any single creator (e.g.
createBasicWeatherFetchWorkflow) instead. The bulk function is just a convenience wrapper.
You can also see your Workflow Definitions in the IDE Extensions Workflow Service panel.
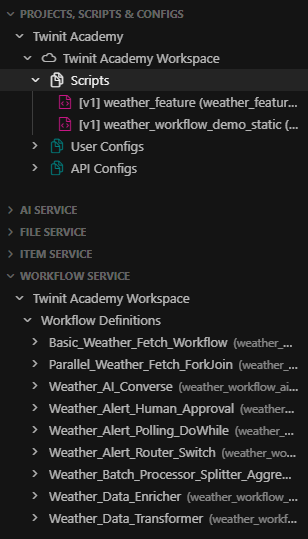
Step 2: Run a Workflow
- Continue using Code
- Continue using IDE Extension
Run runWeatherWorkflow with input pasting the JSON below into the input field:
{ "workflowUserType": "weather_workflow_basic_static" }
runWeatherWorkflow looks the definition up by _userType, then starts a run. It is worth reading how it starts the run, because the SDK has a sharp edge here:
const runBody = {
    _workflowDefId: workflow._id,   // REQUIRED on the body
    _inputParams: inputParams || {}
};
const result = await IafWorkflowSvc.runWorkflow(workflow._id, runBody, ctx);
The REST contract for POST /workflowsvc/api/v1/workflows requires
_workflowDefId in the body. The SDK's runWorkflow(workflowDefId, ...) takes the id as its first argument but does not add it to the request for you, so you must include it in runBody yourself. Omitting it returns HTTP 400. Keep this in mind whenever you start a workflow from your own code.
The function returns the started run's id and status:
{ workflowId, workflowName, runResult: { _id, _status, ... } }
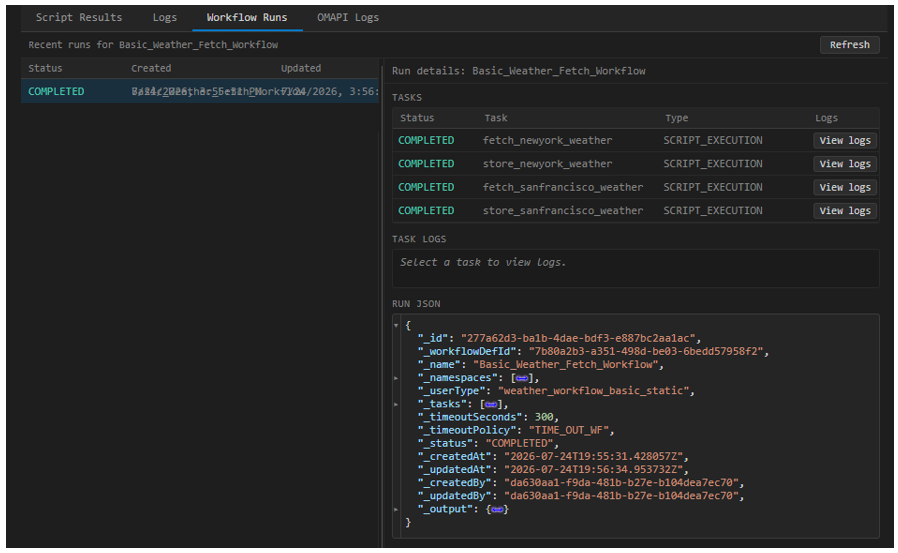
Right click the Basic_Weather_Fetch_Workflow Workflow Definition in the Workflow Service panel of the IDE Extension. Select 'Run Workflow'.
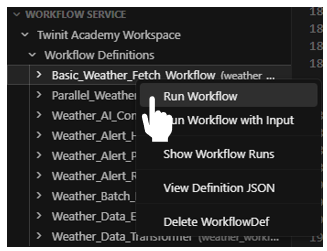
The Workflow will be started on Twinit.
To track it's progress and results, right click ont he same Workflow Definition and select 'Show Workflow Runs'.
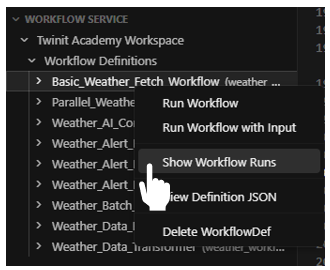
The Twinit IDE Console will open the Workflow Runs tab and should show the Workflow as either QUEUED or RUNNING.
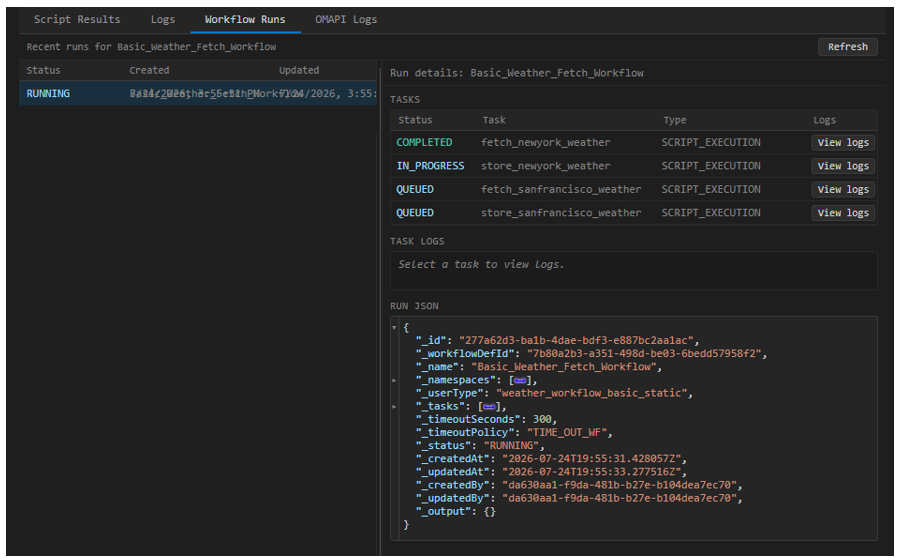
Click the Refresh buttton to fetch the latest run status until the workflow shows as COMPLETE.
Step 3: Check the result
- Continue using Code
- Continue using IDE Extension
A workflow run is asynchronous. Two helpers let you observe it:
-
getLatestWorkflowRunByUserTypewith{ "workflowUserType": "weather_workflow_basic_static" }returns the most recent run for a definition, including per-task status and results. Use this when you just want the latest outcome. -
pollWorkflowUntilCompletewith{ "workflowId": "<run id from step 3>" }polls until the run reaches a terminal state (COMPLETED,FAILED,TIMED_OUT,TERMINATED) or the poll budget is exhausted, then returns the final status and each task's result.
A completed basic run shows four tasks in COMPLETED status. The two store tasks report how many readings they wrote. You can confirm the data landed by running fetchSensorReadingsPerSourceId (from the weather_feature script), which reads the telemetry readings back out per site.
A workflow run is asynchronous. As you saw in the previous step when you used the refresh button in the Twinit IDE Console to track the workflow run until it completed.
If you have closed the Twinit IDE Console since completing the previous step, reopen the workflow runs by right clicking on the Basic_Weather_Fetch_Worfklow in the Workflow service panel and selecting 'Show Workflow Runs'.
Select the COMPLETED workflow run and take a look at the RUN JSON field to the right. This is the result of the workflow run as returned by the last task in the workflow sequence. You can examine the final output by expanding the _output fiels
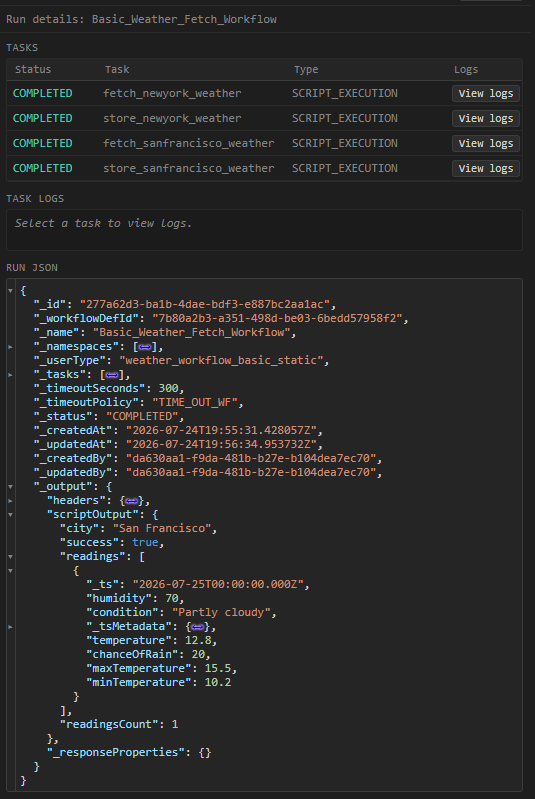
In this case the _output is the weather froecast for San Francisco, as that was the last ask in the workflow sequence.
You can also view the logs produced by each task in the workflow run. Click the View Logs button next to the store_newyork_weather task. The logs form the task execution will appear for you to inspect.
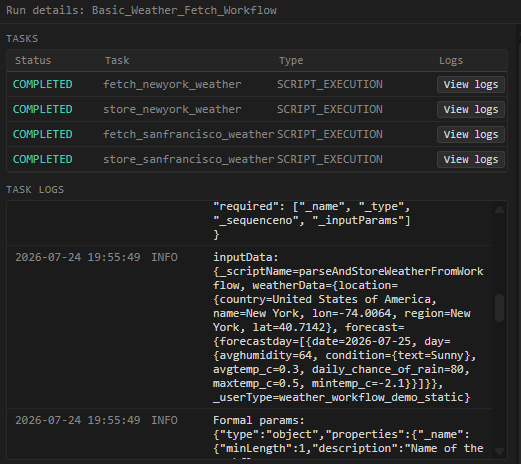
You can use the task logs to validate the input parameters of the task, as well as any other logs that would be created, including those you log in a custom script.
The create → run → monitor cycle
Every remaining lesson follows the same shape:
- Create the definition (already done by
createAllWeatherWorkflows, or re-run the individual creator to study it). - Run it with the IDE Extension or
runWeatherWorkflow(some workflows take runtime inputs). - Monitor it with the IDE Extension or
getLatestWorkflowRunByUserTypeorpollWorkflowUntilComplete, and inspect task-level detail when needed.
There is also runAllWeatherWorkflows, which starts every definition in one call (optionally polling each to completion). It is convenient once you understand the individual workflows, but work through them one at a time first. That is what the next lessons do.